Removal And Installation: Halfshaft: Installation
NOTE:
Before tightening suspension bushing fasteners, use a jackstand to raise the rear suspension until the distance between the center of the hub and the lip of the fender is equal to the measurement taken in the removal procedure (curb height).
- 1.NOTE: The circlips are unique in size and shape for each shaft. Make sure to use the specified circlip for the application or vehicle damage may occur.
Install a new circlip on the halfshaft.
- 2.
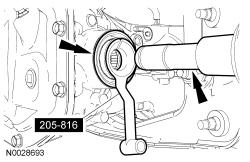
Using the Axle Seal Protector 205-816, install the halfshaft inner CV joint into the differential.- Make sure the circlip locks in the side gear.
- 6.
Position the wheel speed sensor harness in the retainers and install the sensor and bolt.- Tighten to 15 Nm (133 lb-in).
- 8.
Position a suitable jackstand under the lower control arm at the shock and spring assembly attachment point and raise the rear suspension until the distance between the center of the hub and the lip of the fender is equal to the measurement taken in Step 1 of the Removal procedure (curb height).
- 9.NOTE: A slotted upper arm allows for the rear suspension camber to be adjusted by pushing inward or pulling outward on the wheel knuckle while tightening the upper arm to wheel knuckle nut.
With the wheel knuckle pushed inward for maximum negative camber, tighten the upper arm to wheel knuckle nut.
- Tighten to 200 Nm (148 lb-ft).
- 13.NOTE: Use the hex holding feature to prevent the stabilizer bar link stud from turning while removing or installing the nut.
Connect the stabilizer bar link and install a new stabilizer bar link upper nut.
- Tighten to 55 Nm (41 lb-ft).
- 14.
Position the brake caliper and anchor plate assembly and install the 2 bolts.- Tighten to 103 Nm (76 lb-ft).
- 15.NOTE: Do not tighten the wheel hub nut with the vehicle on the ground. The nut must be tightened to specification before the vehicle is lowered onto the wheels. Wheel bearing damage will occur if the wheel bearing is loaded with the weight of the vehicle applied.NOTE: Apply the brake to keep the halfshaft from rotating.
Use the previously removed hub nut to seat the halfshaft.
- Tighten to 350 Nm (258 lb-ft).
- Remove and discard the hub nut.
- 16.NOTE: The wheel hub nut contains a one time locking chemical that is activated by the heat created when it is tightened. Install and tighten the new wheel hub nut to specification within 5 minutes of starting it on the threads. Always install a new wheel hub nut after loosening or when not tightened within the specified time or damage to the components can occur.NOTE: Apply the brake to keep the halfshaft from rotating.
Install a new hub nut.
- Tighten to 350 Nm (258 lb-ft).
- 17.
Install the wheel and tire. REFER to Wheels and Tires .
- 18.
Check and if necessary, adjust the rear toe. REFER to Suspension System - General Information .