Lower Arm: Installation
- 1.NOTE: Suspension fasteners are critical parts that affect performance of vital components and systems. Failure of these fasteners may result in major service expense. Use the same or equivalent parts if replacement is necessary. Do not use a replacement part of lesser quality or substitute design. Tighten fasteners as specified.NOTE: Before tightening the lower arm bolts, use a jackstand to raise the rear suspension until the distance between the center of the hub and the lip of the fender is equal to the measurement taken in the Removal procedure (curb height).
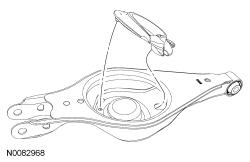
Position the lower arm and loosely install the new lower arm-to-subframe bolt.
- 2.NOTE: Make sure the lower spring seat is properly positioned in the lower arm.
Install the spring and position the screw-type jackstand under the lower arm.
- 3.NOTE: Do not tighten the lower arm-to-knuckle nut at this time.
Raise the jackstand and loosely install the new lower arm-to-knuckle bolt and nut.
- 4.
Using the jackstand, raise the rear suspension until the distance between the center of the hub and the lip of the fender is equal to the measurement taken in the Removal procedure (curb height).
- 7.NOTE: Use the hex-holding feature to prevent the stabilizer bar link stud from turning while tightening the nut.
Position the stabilizer bar links and install 2 new stabilizer bar link upper nuts.
- Tighten to 55 Nm (41 lb-ft).
- 8.
Install the rear wheels and tires. REFER to Wheels and Tires