Forward Clutch System
For forward (1, 2, 3, 4) clutch operation, REFER to Hydraulic System or Mechanical System .
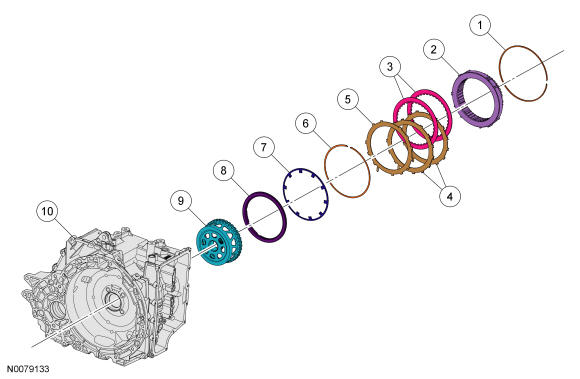
| Item | Part Number | Description |
|---|---|---|
| 1 | 7D483 | Low OWC snap ring |
| 2 | 7A089 | Low OWC |
| 3 | 7B164 | Forward clutch friction plates |
| 4 | 7B442 | Forward clutch steel plates |
| 5 | 7B070 | Forward clutch waved cushion spring |
| 6 | 7H365 | Forward clutch piston snap ring |
| 7 | 7B070 | Forward clutch piston return spring |
| 8 | 7A262 | Forward clutch piston |
| 9 | 7D064 | Front sun gear and shell assembly |
| 10 | 7005 | Transmission case |
Forward Clutch
| Condition | Possible Sources | Action |
|---|---|---|
| Forward (1, 2, 3, 4) clutch does not apply | Solenoid body filter blocked to SSA | CLEAN or INSTALL a new solenoid body filter screen. REFER to Solenoid Body Assembly . |
| SSA mechanically stuck OFF | INSTALL a new solenoid body. REFER to Solenoid Body Assembly . Download the new Solenoid Body Strategy into the PCM, REFER to Solenoid Body Strategy Download . | |
| Forward (1, 2, 3, 4) clutch regulator valve stuck OFF | DISASSEMBLE, CLEAN and INSPECT the forward (1, 2, 3, 4) clutch regulator valve. If bore or valve is damaged, INSTALL a new main control valve body. REFER to Main Control Valve Body . | |
| SSA SIG, CB1234, CB1234 SUP hydraulic circuits blocked/leaking | DISASSEMBLE and INSPECT the main control valve body and separator plate passages for debris/blockage. CLEAN as necessary. REFER to Hydraulic System . | |
| CB1234 seal leaking | REMOVE the main control valve body, REFER to Main Control Valve Body . INSPECT the CB1234 circuit seal between the main control valve body and the transmission case for missing or damaged seal. INSTALL a new seal. REFER to Main Control Valve Body . | |
| Front planetary sun gear and shell assembly | INSPECT the sun gear and shell for wear and damage. INSTALL new components as necessary, REFER to Mechanical System . | |
| Low OWC snap ring | INSPECT the low OWC snap ring for proper seating in case. REFER to Mechanical System . | |
| Low OWC /Forward (1, 2, 3, 4) clutch steel plate | INSPECT the low OWC /Forward (1, 2, 3, 4) clutch steel plate surface. INSTALL a new low OWC as necessary. REFER to Mechanical System . | |
| Low OWC /Forward (1, 2, 3, 4) clutch friction plates | DISASSEMBLE and INSPECT the forward (1, 2, 3, 4) clutch friction and steel plates. INSTALL new components as necessary. REFER to Mechanical System . | |
| Forward (1, 2, 3, 4) clutch piston seal leakage. | INSTALL a new forward (1, 2, 3, 4) clutch piston. REFER to Mechanical System . | |
| Forward (1, 2, 3, 4) clutch always applied | Solenoid body filter seal damaged at SSA | INSTALL a new solenoid body filter screen. REFER to Solenoid Body Assembly . |
| SSA mechanically stuck ON | INSTALL a new solenoid body. REFER to Solenoid Body Assembly . Download the new Solenoid Body Strategy into the PCM, REFER to Solenoid Body Strategy Download . | |
| Forward (1, 2, 3, 4) clutch regulator valve stuck ON | DISASSEMBLE, CLEAN and INSPECT the forward (1, 2, 3, 4) clutch regulator valve. If bore or valve is damaged, INSTALL a new main control valve body. REFER to Main Control Valve Body . | |
| SSA SIG, CB1234, CB1234 SUP hydraulic circuits blocked/leaking | DISASSEMBLE and INSPECT the main control valve body and separator plate passages for leakage. INSPECT the CB1234 check ball for blocked passage. CLEAN as necessary. REFER to Hydraulic System . | |
| Front planetary sun gear and shell assembly | INSPECT the sun gear and shell for damage that would prevent free rotation. INSTALL new components as necessary, REFER to Mechanical System | |
| Forward (1, 2, 3, 4) clutch friction plates | DISASSEMBLE and INSPECT the forward (1, 2, 3, 4) clutch friction and steel plates. INSTALL new components as necessary. REFER to Mechanical System . | |
| Forward (1, 2, 3, 4) clutch piston return spring | INSPECT the return spring for proper installation and damage. INSTALL new components as necessary. REFER to Mechanical System . | |
| Forward (1, 2, 3, 4) clutch delayed/soft/slipping apply | Incorrect Solenoid Body Strategy programmed into PCM | REFER to Solenoid Body Strategy Download . |
| Solenoid body filter seal damaged at SSA | INSTALL a new solenoid body filter screen. REFER to Solenoid Body Assembly . | |
| SSA mechanically sticking | INSTALL a new solenoid body. REFER to Solenoid Body Assembly . Perform the Solenoid Body Strategy, REFER to Solenoid Body Strategy Download . | |
| Forward (1, 2, 3, 4) clutch regulator valve sticking | DISASSEMBLE, CLEAN and INSPECT the forward (1, 2, 3, 4) clutch regulator valve. If bore or valve is damaged, INSTALL a new main control valve body. REFER to Main Control Valve Body . | |
| Forward (1, 2, 3, 4) clutch latch valve stuck ON | DISASSEMBLE, CLEAN and INSPECT the forward (1, 2, 3, 4) clutch boost valve and bias spring. If bore, valve or spring is damaged, INSTALL a new main control valve body. REFER to Main Control Valve Body . | |
| SSA SIG, CB1234, CB1234 SUP hydraulic circuits blocked/leaking | DISASSEMBLE and INSPECT the main control valve body and separator plate passages for debris/blockage. CLEAN as necessary. REFER to Hydraulic System | |
| C1234 seal leaking | REMOVE the main control valve body, REFER to Main Control Valve Body . INSPECT the CB1234 circuit seal between the main control valve body and the transmission case for missing or damaged seal. INSTALL a new seal. REFER to Main Control Valve Body . | |
| Low OWC /Forward (1, 2, 3, 4) clutch pressure plate | INSPECT the low OWC /Forward (1, 2, 3, 4) clutch pressure plate surface. INSTALL a new low OWC as necessary. | |
| Forward (1, 2, 3, 4) clutch friction plates | DISASSEMBLE and INSPECT the forward (1, 2, 3, 4) clutch friction and steel plates. INSTALL new components as necessary. REFER to Mechanical System . | |
| Forward (1, 2, 3, 4) clutch piston return spring | INSPECT the return spring for proper installation and damage. INSTALL new components as necessary. REFER to Mechanical System . | |
| Forward (1, 2, 3, 4) clutch harsh apply | Incorrect Solenoid Body Strategy programmed into PCM | REFER to Solenoid Body Strategy Download . |
| SSA mechanically sticking | INSTALL a new solenoid body. REFER to Solenoid Body Assembly . Perform the Solenoid Body Strategy, REFER to Solenoid Body Assembly . | |
| Forward (1, 2, 3, 4) clutch regulator valve sticking | DISASSEMBLE, CLEAN and INSPECT the forward (1, 2, 3, 4) clutch regulator valve and bias spring. If bore, valve or spring is damaged, INSTALL a new main control valve body. REFER to Main Control Valve Body . | |
| Forward (1, 2, 3, 4) clutch latch valve sticking | DISASSEMBLE, CLEAN and INSPECT the forward (1, 2, 3, 4) clutch boost valve and bias spring. If bore, valve or spring is damaged, INSTALL a new main control valve body. REFER to Main Control Valve Body . | |
| SSA SIG, CB1234, CB1234 SUP hydraulic circuits blocked/leaking | DISASSEMBLE and INSPECT the main control valve body and separator plate passages for leakage. INSPECT CB1234 check ball for blocked passage. CLEAN as necessary. REFER to Hydraulic System . | |
| Forward (1, 2, 3, 4) clutch piston return spring | INSPECT the return spring for proper installation and damage. INSTALL new components as necessary. REFER to Mechanical System | |
| Forward (1, 2, 3, 4) clutch friction plates | DISASSEMBLE and INSPECT the forward (1, 2, 3, 4) clutch friction and steel plates. INSTALL new components as necessary. REFER to Mechanical System . | |