Halfshaft - RH, Front Wheel Drive (FWD): Installation
- 1.
Install a new RH halfshaft seal. If equipped with a 6F35 transmission refer to REFER to Automatic Transmission - 6F35 , If equipped with a 6F50/6F55 refer to REFER to Automatic Transmission - 6F50/6F55 .
- 2.
Install the halfshaft assembly, (if equipped with trailer tow) the heat shield, and the 2 halfshaft bracket nuts.- Tighten to 25 Nm (18 lb-ft).
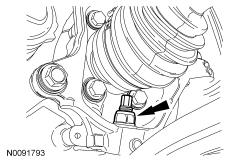
- 4.
Position the lower ball joint into the wheel knuckle and install the new nut.- Tighten to 200 Nm (148 lb-ft).
- 5.
Position the tie-rod end into the wheel knuckle and install a new tie-rod end nut.- Tighten to 150 Nm (111 lb-ft).
- 6.NOTE: Do not tighten the front wheel hub nut with the vehicle on the ground. The nut must be tightened to specification before the vehicle is lowered onto the wheels. Wheel bearing damage will occur if the wheel bearing is loaded with the weight of the vehicle applied.NOTE: Apply the brake to keep the halfshaft from rotating.
Using the previously removed wheel hub nut, seat the halfshaft.
- Tighten to 350 Nm (258 lb-ft).
- Remove and discard the wheel hub nut.
- 7.NOTE: The wheel hub nut contains a one time locking chemical that is activated by the heat created when it is tightened. Install and tighten the new wheel hub nut to specification within 5 minutes of starting it on the threads. Always install a new wheel hub nut after loosening or when not tightened within the specified time or damage to the components can occur.NOTE: Apply the brake to keep the halfshaft from rotating.
Install a new wheel hub nut.
- Tighten to 350 Nm (258 lb-ft).
- 8.
Install the wheel and tire. REFER to Wheels and Tires .
- 9.
Check the transmission fluid level and add clean transmission fluid as necessary. REFER to Automatic Transmission - 6F50/6F55 .