Removal And Installation: Camshafts: Removal
WARNING: This page is about a different variant/trim than selected.
NOTE:
During engine repair procedures, cleanliness is extremely important. Any foreign material (including any material created while cleaning gasket surfaces) that enters the oil passages, coolant passages or the oil pan can cause engine failure.
NOTE:
Do not rotate the camshafts unless instructed to in this procedure. Rotating the camshafts or crankshaft with timing components loosened or removed can cause serious damage to the valves and pistons.
- 1.
With the vehicle in NEUTRAL, position it on a hoist. REFER to Jacking and Lifting .
- 2.
Check the valve clearance. Refer to Valve Clearance Check .
- 3.
Remove the camshaft phaser and sprockets. Refer to Camshaft Phaser and Sprocket .
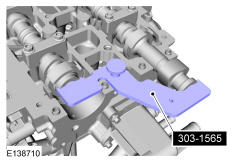
- 4.
Remove the Camshaft Alignment Tool from the rear of both of the camshaft slots.
NOTE:
The Camshaft Alignment Tool is for camshaft alignment only. Using this tool to prevent engine rotation can result in engine damage.
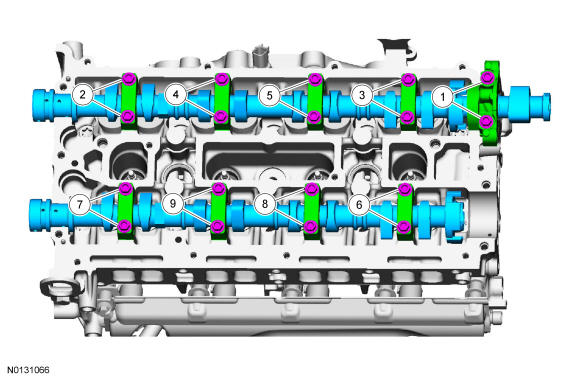
- 7.
Remove the camshafts from the engine.- 1.
Loosen the camshaft bearing caps in sequence 2 turns at a time until all tension is released from the camshaft bearing caps.
- 2.
Remove the camshaft bearing caps.
- 3.
Remove the camshafts.
- 1.
NOTE:
Inspect the camshaft bores for any scratches that can be felt by hand.
NOTE:
Note the position of the camshaft lobes on the No. 1 cylinder for installation reference.
NOTE:
Failure to follow the camshaft loosening procedure can result in damage to the camshafts.