Cylinder Head: Installation
WARNING: This page is about a different variant/trim than selected.
NOTE:
Do not use metal scrapers, wire brushes, power abrasive discs or other abrasive means to clean the sealing surfaces. These tools cause scratches and gouges that make leak paths. Use a plastic scraping tool to remove all traces of the head gasket.
- 1.
Clean the cylinder head-to-cylinder block mating surface of both the cylinder head and the cylinder block in the following sequence.- 1.
Remove any large deposits of silicone or gasket material with a plastic scraper.
- 2.
Apply Motorcraft ®Silicone Gasket Remover following package directions, and allow to set for several minutes.
- 3.
Remove the Motorcraft ®Silicone Gasket Remover with a plastic scraper. A second application of Motorcraft ®Silicone Gasket Remover may be required if residual traces of silicone or gasket material remain.
- 4.
Apply Motorcraft ® Metal Surface Prep following package directions, to remove any traces of oil or coolant, and to prepare the surfaces to bond with the new gasket. Do not attempt to make the metal shiny. Some staining of the metal surfaces is normal.
- 1.
NOTE:
If there is no residual gasket material present, metal surface prep can be used to clean and prepare the surfaces.
NOTE:
Clean the cylinder head bolt holes in the cylinder block. Make sure all coolant, oil or other foreign material is removed.
NOTE:
Observe all warnings or cautions and follow all application directions contained on the packaging of the silicone gasket remover and the metal surface prep.
- 2.
Check the cylinder head distortion and the cylinder block distortion. REFER to Engine System General Information - Cylinder Head Distortion and REFER to Engine System General Information - Cylinder Block Distortion .
- 4.
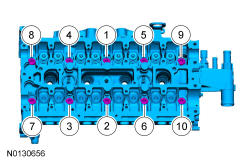
Install the cylinder head and the 10 new bolts.- Tighten the bolts in the sequence shown in 5 stages.
- Stage 1: Tighten to 7 Nm (62 lb-in).
- Stage 2: Tighten to 15 Nm (133 lb-in).
- Stage 3: Tighten to 55 Nm (41 lb-ft).
- Stage 4: Tighten 90 degrees.
- Stage 5: Tighten an additional 90 degrees.
- Tighten the bolts in the sequence shown in 5 stages.
NOTE:
The cylinder head bolts are torque-to-yield and must not be reused. New cylinder head bolts must be installed.
- 5.
Install the 16 valve tappets in their original positions.
NOTE:
Lubricate the valve tappets with clean engine oil prior to installing.

- 9.
Install the camshafts. Refer to Camshafts .
- 10.
Install the fuel injectors. Refer to FUEL INJECTORS .
- 11.
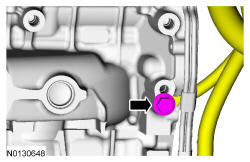
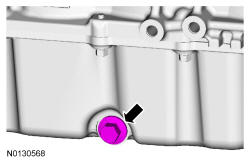
Remove the drain plug and drain the engine oil.- Install the drain plug and tighten to 27 Nm (20 lb-ft).
- 12.
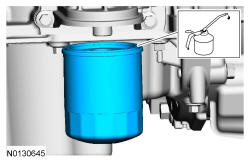
Install a new engine oil filter.- Tighten to 8 Nm (71 lb-in) plus an additional 180 degrees.
NOTE:
Lubricate the engine oil filter gasket with clean engine oil prior to installing the oil filter.
- 13.
Install the turbocharger. Refer to TURBOCHARGER .