Fuel Rail - 3.5L GTDI: Removal
WARNING: This page is about a different variant/trim than selected.
WARNING:
Before beginning any service procedure in this service information, refer to SAFETY WARNINGS
WARNING:
Before working on or disconnecting any of the fuel tubes or fuel system components, relieve the fuel system pressure to prevent accidental spraying of fuel. Fuel in the fuel system remains under high pressure, even when the engine is not running. Failure to follow this instruction may result in serious personal injury.
WARNING:
Clean all fuel residue from the engine compartment. If not removed, fuel residue may ignite when the engine is returned to operation. Failure to follow this instruction may result in serious personal injury.
NOTE:
A clean working environment is essential to prevent dirt or foreign material contamination.
- 1.
Release the fuel system pressure, REFER to Fuel System - General Information .
- 2.
Disconnect the battery ground cable, REFER to Battery, Mounting and Cables .
- 3.
Remove the intake manifold, ENGINE - 3.5L GTDI .
- 4.NOTE: When removing or installing the fuel injection pump noise insulator, spreading the openings will reduce the risk of damage.
Remove the fuel injection pump noise insulator.
- 5.NOTE: To release the fuel pressure in the high-pressure fuel tube, wrap the high-pressure fuel tube flare nuts with a shop towel to absorb any residual fuel pressure during the loosening of high-pressure fuel tube flare nuts.
Remove the high pressure fuel tube bracket nut and discard. Disconnect the high pressure fuel tube flare nuts, remove and discard the high pressure fuel tube.

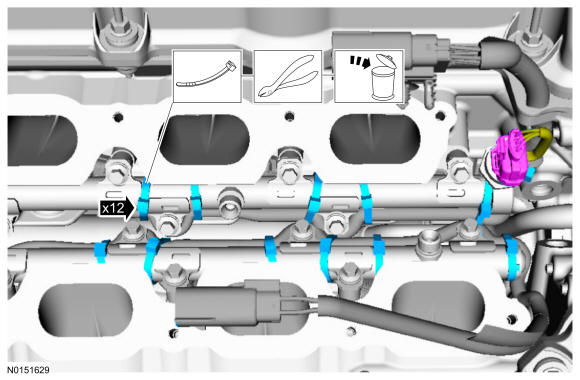
- 6.NOTE: It is very important to note the routing of the fuel charge wire harnesses on the fuel rails and index-mark the location of the tie straps prior to removal or damage may occur to the wire harnesses during installation.NOTE: Use compressed air and remove any dirt or foreign material from the cylinder head, block and general surrounding area of the fuel rail and injectors.
Disconnect the Fuel Rail Pressure (FRP) sensor electrical connector. Cut, remove and discard the fuel charge wiring harness tie straps.
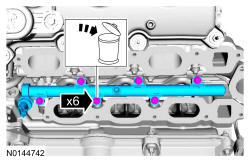
- 7.NOTE: Pull out the fuel rails in the direction of the fuel injector axis or damage may occur to the fuel injectors.NOTE: When removing the fuel rails, the fuel injectors may remain in the cylinder heads and require the use of a Fuel Injector Remover tool to extract. Wiggling the injector by hand to break it loose may allow the injector to be removed by hand.
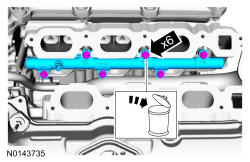
Remove and discard the fuel rail bolts. Remove the fuel rails.
- 8.NOTE: Pull out the fuel rails in the direction of the fuel injector axis or damage may occur to the fuel injectors.NOTE: When removing the fuel rails, the fuel injectors may remain in the cylinder heads and require the use of a Fuel Injector Remover tool to extract. Wiggling the injector by hand to break it loose may allow the injector to be removed by hand.
Remove and discard the fuel rail bolts. Remove the fuel rails.
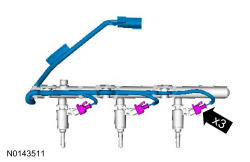
- 9.NOTE: RH shown in illustration, LH similar.
Disconnect the fuel injector electrical connectors and remove fuel charge wire harnesses.

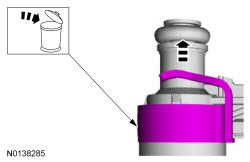
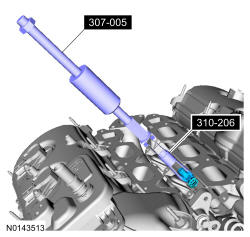
- 12.NOTE: Use minimal force to remove the fuel injectors that remained in the cylinder head with the Fuel Injector Remover tool or damage to the fuel injector assembly may occur. Wiggling the injector by hand to break it loose may allow the injector to be removed by hand.
Using the Slide Hammer and the Fuel Injector Remover, remove any of the fuel injectors that remained in the cylinder head.
- Special Tool(s): Slide Hammer 307-005 (T59L-100-B) or equivalent.
- Special Tool(s): Remover, Fuel Injector 310-206.