PINPOINT TEST L : The Roof Opening Panel Does Not Open or Close - Shade
- L1 CHECK THE ROOF OPENING PANEL SHADE ASSEMBLY
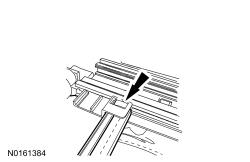
- Check the roof opening panel shade for damage, creases, or marks.
- Using a mechanics mirror, check both of the roof opening panel shade to roof opening panel shade operating cable and guide retaining clips for cracks or breakage.
NOTE: View from above vehicle, for clarity.Are both roof opening panel shade operating cable and guide retaining clips OK?
Yes GO to L2. No If the roof opening panel shade is also damaged, INSTALL a new roof opening panel shade and the roof opening panel cable and guide(s) - shade as necessary. Refer to Roof Opening Panel Operating Cable and Guide - Shade . If the roof opening panel shade is not damaged, INSTALL a new roof opening panel cable and guide(s) - shade as necessary. Refer to Roof Opening Panel Operating Cable and Guide - Shade . - L2 CHECK THE ROOF OPENING PANEL SHADE MOTOR FOR INITIALIZATION
- Carry out the roof opening panel shade motor initialization procedure. Refer to Roof Opening Panel Motor Initialization - Shade .
Is the concern still present?
Yes GO to L3. No The system is operating normally at this time. The roof opening panel shade motor was not initialized. - L3 CHECK THE FRONT SLIDING GLASS PANEL OPERATION
- Attempt to open and close the front sliding glass panel using the roof opening panel control switch.
Does the front sliding glass panel open and close using the control switch?
Yes GO to L4. No GO to Pinpoint Test B . - L4 CHECK THE ROOF OPENING PANEL CONTROL SWITCH
- Ignition OFF.
- Disconnect: Roof Opening Panel Control Switch.
- Carry out the Roof Opening Panel Control Switch Component Test. Refer to OEM WIRING DIAGRAMS COMPONENT TESTING for component testing.
Is the roof opening panel control switch OK?
Yes GO to L5. No INSTALL a new roof opening panel control switch. Refer to Roof Opening Panel Control Switch . - L5 CHECK THE SHADE OPEN CIRCUIT FOR AN OPEN
- Disconnect: Roof Opening Panel Module.
Is the resistance less than 5 ohms?
Yes CHECK the overhead console jumper harness for loose pins or an open in circuit CPR86 (GY/BN) between the sunshade smartmotor and overhead console C921-8. If the overhead console jumper harness is not OK, INSTALL a new overhead console jumper harness. If the overhead console jumper harness is OK, GO to L6. No REPAIR the circuit. - L6 CHECK THE SHADE OPEN CIRCUIT FOR A SHORT TO GROUND
- Measure:
Positive Lead Measurement / Action Negative Lead C921-8 Ground
Is the resistance greater than 10, 000 ohms?
Yes CHECK the overhead console jumper harness for loose pins or a short in circuit CPR86 (GY/BN) between the sunshade smartmotor and overhead console C921-8. If the overhead console jumper harness is not OK, INSTALL a new overhead console jumper harness. If the overhead console jumper harness is OK, GO to L7. No REPAIR the circuit. - Measure:
- L7 CHECK THE SHADE CLOSE CIRCUIT FOR AN OPEN
Is the resistance less than 5 ohms?
Yes CHECK the overhead console jumper harness for loose pins or an open in circuit CPR85 (GN/WH) between the sunshade smartmotor socket and overhead console C921-9. If the overhead console jumper harness is not OK, INSTALL a new overhead console jumper harness. If the overhead console jumper harness is OK, GO to L8. No REPAIR the circuit. - L8 CHECK THE SHADE CLOSE CIRCUIT FOR A SHORT TO GROUND
- Measure:
Positive Lead Measurement / Action Negative Lead C921-9 Ground
Is the resistance greater than 10, 000 ohms?
Yes CHECK the overhead console jumper harness for loose pins or a short in circuit CPR85 (GN/WH) between the sunshade smartmotor and overhead console C921-9. If the overhead console jumper harness is not OK, INSTALL a new overhead console jumper harness. If the overhead console jumper harness is OK, GO to L9. No REPAIR the circuit. TEST the system for normal operation. - Measure:
- L9 CHECK THE ROOF OPENING PANEL MODULE FOR CORRECT OPERATION
- Ignition OFF.
- Disconnect and inspect the roof opening panel module connector.
- Repair:
- corrosion (install new connector or terminal - clean module pins)
- damaged or bent pins - install new terminals/pins
- pushed-out pins - install new pins as necessary
- Reconnect the roof opening panel module connector. Make sure it seats and latches correctly.
- Operate the system and determine if the concern is still present.
Is the concern still present?
Yes CHECK OASIS for any applicable TSBs. If a TSB exists for this concern, DISCONTINUE this test and FOLLOW the TSB instructions. If no TSBs address this concern, INSTALL a new roof opening panel shade. Refer to Roof Opening Panel Shade Assembly . No The system is operating correctly at this time. The concern may have been caused by a loose or corroded connector. ADDRESS the root cause of any connector or pin issues.