Exhaust Odor In Vehicle (16-0166)
Reference number: 16-0166
Supersedes refnos: 16-0165
EXHAUST ODOR IN VEHICLE
TECHNICAL SERVICE BULLETIN
| FORD: | 2011-2015 Explorer |
ISSUE
Some 2011-2015 Explorer vehicles may exhibit an exhaust odor in the vehicle with the auxiliary climate control system on. Customers may indicate the odor smells like sulfur, or that exhaust odors are entering the vehicle cabin. This condition may be worsened when the climate control system is in recirculate mode and the vehicle is heavily accelerated for an extended period. Whether and to what extent any customer or occupant of a 2011-2015 Explorer vehicle experiences the exhaust odor will be affected by driving habits, weather and individual sensitivities.
ACTION
Follow each and every step of the Service Procedure in procedure 1 to improve the condition.
SERVICE PROCEDURES
Procedure 2 does not apply to vehicles equipped with the 2.0L Gasoline Turbocharged Direct Injection (GTDI) and 3.5L GTDI engines.
- Is the customer returning with the exhaust odor complaint after Procedure 1 was completed?
- No - proceed to PROCEDURE 1 .
- Yes - Is the vehicle equipped with the 3.5L Twin Independent Variable Cam Timing (Ti-VCT) engine?
- Yes - proceed to PROCEDURE 2 .
- No - the procedure does not apply. Continue with normal diagnostics.
PROCEDURE 1
- Reprogram the heating ventilation air conditioning (HVAC) module to the latest calibration using IDS release 101.03 or higher. Make sure you are connected to the internet when entering module programming to obtain the latest updates. Calibration files may also be obtained at www.motorcraftservice.com.
- When reprogramming the HVAC, IDS will have additional questions which will require a yes response to reprogram the module.
- Remove the rear bumper cover. Refer to Workshop Manual (WSM), Section 501-19.
- Remove the left and right tail lamps. Refer to WSM, Section 417-01.
- Remove the wheel lip mouldings. Refer to WSM, Section 501-08.
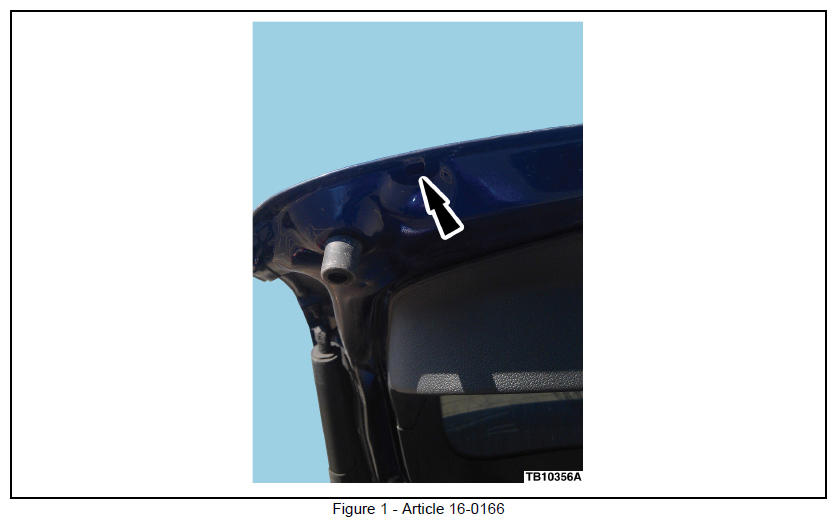
- Open the liftgate and inspect for presence of drain valves in the two (2) drain holes on the left and right side of the liftgate. Are the drain valves present? (Figure 1)
- Yes - proceed to Step 7.
- No - proceed to Step 6.
- Install a new drain valve in each of the two (2) drain holes on the left and right side of the liftgate. (Figure 1)
- Inspect the liftgate seal for damage and proper fit/contact pattern. Adjusting the rear liftgate striker so that the rear hatch seals tighter to the liftgate seal is important. This can be done by loosening the striker and moving it to increase the liftgate sealing pressure.
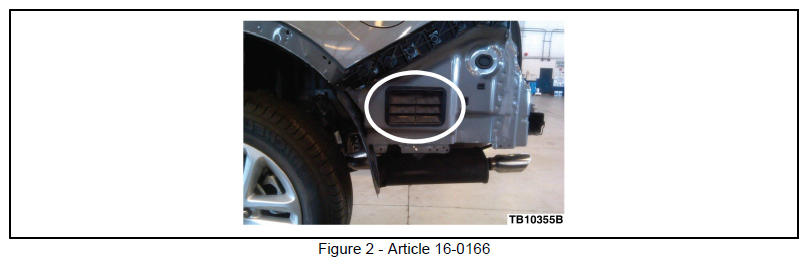
- Inspect the left and right side air extractors for proper fit to the body and operation/sealing of the rubber flaps.
- Inspect and verify proper installation of the wire harness grommets and body plugs in the liftgate opening, quarter panels under the tail lamps, license plate and bumper cover and the rear underbody area.
- Using masking tape, seal the left and right air extractor vents and the rear auxiliary climate control drain tube.
- Make sure to tape off only the vents and not the area around the air extractor where it seals to the body of the vehicle.
- Start the vehicle and set the front climate control to fresh air mode and front blower speed to HI. Turn the rear climate control off.
- Make sure all windows are up and all doors are closed in order to pressurize the cabin.
- Use soapy water (dish soap or bubble bath works best-not bar soap) in a spray bottle to help locate air leaks.
- Spray the underbody seams, rubber grommets, rear wheel well seams, tail lamp seams, liftgate seals, quarter glass seals, license plate area, liftgate hinge area, auxiliary a/c seals and the area where air extractors mount in the body.
- Air leaks will be identified by the presence of air bubbles. Mark the location of any leaks.
- Turn off the a/c and shut the vehicle off.
- Clean and dry all marked areas and seal using Motorcraft® Seam Sealer.
- Raise the vehicle on a hoist. Refer to WSM, Section 100-02.
- Lower and support the rear section of the exhaust system.
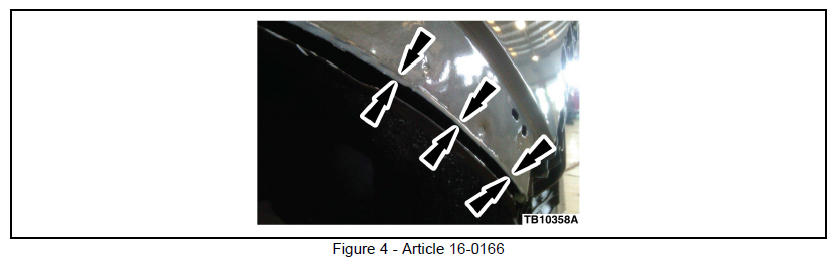
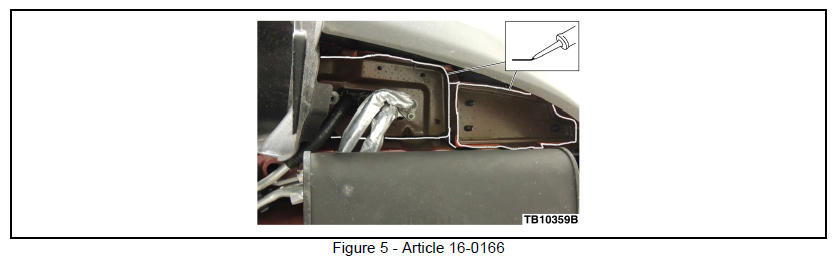
- Clean areas on the underside of the vehicle where seam sealer will be applied. (Figures 3-5)
- Cover the exhaust system and verify the auxiliary climate control drain tape is still in place.
- Apply a generous amount of Motorcraft® Seam Sealer to the following areas:
- The rear horizontal sheet metal lap joints on left and right sides of the vehicle.
- The rear sheet metal overlap flange across the rear of the vehicle. (Figures 3-5)
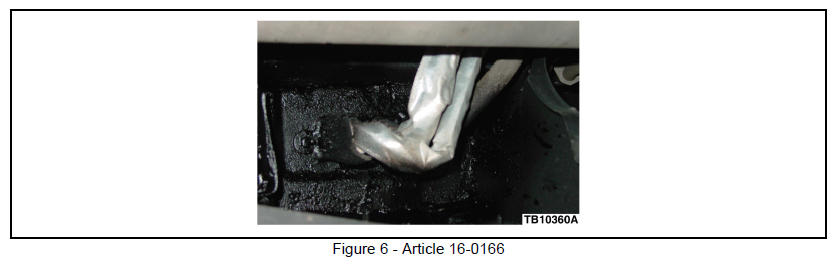
- Spray a generous amount of 3M™ Rubberized Undercoating around the auxiliary air conditioning lines and seam sealer areas. (Figure 6)
- Remove the tape from the air extractors and auxiliary climate control drain.
- Install the rear exhaust system.
- Install the wheel lip mouldings. Refer to WSM, Section 501-08.
- Install the rear bumper cover. Refer to WSM, Section 501-19.
- Apply masking tape around the outer edge of the rear fender mouldings to protect the vehicle from damage.
- Install the tail lamps. Refer to WSM, Section 417-01.
- Is the vehicle equipped with the 3.5L Ti-VCT engine?
- Yes - return the vehicle to the customer for evaluation, close out the repair order and submit the claim for payment.
- Procedure 2 can be performed if the customer returns with the same complaint.
- No - return the vehicle to the customer, close out the repair order and submit claim for payment.
- Procedure 2 does not apply to the vehicle.
- Yes - return the vehicle to the customer for evaluation, close out the repair order and submit the claim for payment.
PROCEDURE 2
- Click here to access Guided Routine. Does the vehicle meet necessary conditions?
- Yes - proceed to Step 2.
- No - return vehicle to the customer. No additional repairs are available.
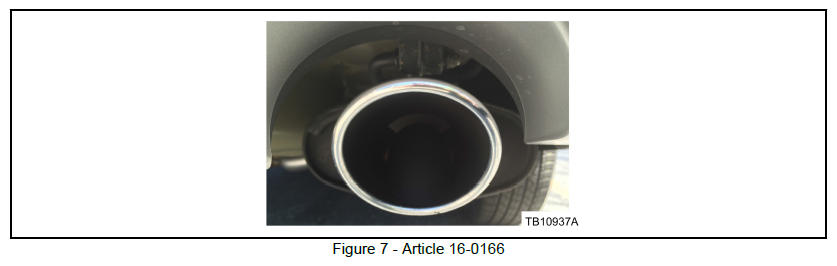
- Inform the customer of the redesigned exhaust tips and that appearance will remain the same but the exhaust will exit the tip from bottom. Upon acceptance, replace the muffler assembly with the updated part containing the down turned exhaust tips. (Figures 7-8)
- Return the vehicle to customer.

| Obtain Locally | |
|---|---|
| Part Number | Part Description |
| 08883 | 3M™ Rubberized Undercoating |
PARTS INFORMATION
| PART NUMBER | PART NAME |
|---|---|
| BB5Z-61280B62-B | Dual Rate Air Extractor |
| BB5Z-7829164-AA | Wheel Lip Moulding Right Side |
| BB5Z-7829165-AA | Wheel Lip Moulding Left Side |
| 4M8Z-54280B62-A | Valve Assembly Auto Drain |
| TA-2-B | Motorcraft® Seam Sealer |
| EB5Z-5230-A | Muffler Assembly |
WARRANTY INFORMATION
| OPERATION | DESCRIPTION | TIME |
|---|---|---|
| 160166A | 2011-2015 Explorer 3.5L Ti-VCT: Perform Web Assessment, Obtain Repair Verification Code (RVC) And Replace The Muffler Assembly Following Procedure 2 (Do Not Use With Any Labor Operations Outside Of This Article) | 0.7 Hr. |
| MT160166 | 2011-2015 Explorer: Reseal The Body Following Procedure 1 Includes Time To Reprogram The HVAC Module (Do Not Use With Any Labor Operations Outside Of This Article) | Actual Time |
WARRANTY STATUS:
Eligible Under Provisions Of New Vehicle Limited Warranty Coverage
Warranty/ESP coverage limits/policies/prior approvals are not altered by a TSB. Warranty/ESP coverage limits are determined by the identified causal part and verified using the OASIS part coverage tool.
| BASIC PART NO. | CONDITION CODE |
|---|---|
| 61280B62 | 42 |