Multi-Contour Seats - Intermittent Multi-Contour Seat Operation And/Or Massage And Lumbar Adjust Inoperative (19-2390)
Reference number: 19-2390
MULTI-CONTOUR SEATS - INTERMITTENT MULTI-CONTOUR SEAT OPERATION AND/OR MASSAGE AND LUMBAR ADJUST INOPERATIVE
TECHNICAL SERVICE BULLETIN
| FORD: | 2015-2020 Explorer; 2018-2020 Expedition; 2015-2019 F-150; 2017-2019 Super Duty |
| LINCOLN: | 2020 Aviator; 2017-2020 Continental; 2020 Corsair; 2016-2018 MKX; 2013-2020 MKZ; 2019-2020 Nautilus; 2018-2020 Navigator |
SERVICE INFORMATION
This bulletin supersedes 19-2293. Reason for update: Concern Carryover to New Model
SUMMARY
This article supersedes TSB 19-2293 to update the vehicle model years affected.
Issue: Some 2015-2019 F-150, 2015-2020 Explorer, 2017-2019 F-Super Duty, 2017-2020 Continental, 2018-2020 Expedition/Navigator, 2016-2018 MKX, 2019-2020 Nautilus, 2020 Aviator/Corsair and 2013-2020 MKZ vehicles equipped with multi-contour seats may exhibit intermittent multi-contour seat operation and/or massage and lumbar adjust inoperative from the seat switch or SYNC screen with or without diagnostic trouble code (DTC) B1471, U024B, and/or U024C. This may be due to terminal fretting at the connector for the driver multi-contour seat module (SCMG) and passenger multi-contour seat module (SCMH). To correct the condition, follow the Service Procedure steps to replace the connectors and reroute the harness.
Action: Follow the Service Procedure steps to correct the condition on vehicles that meet all of the following criteria:
- One of the following vehicle lines:
- 2015-2019 F-150
- 2017-2019 F-Super Duty
- 2017-2020 Continental
- 2018-2020 Expedition/Navigator
- 2016-2018 MKX
- 2019-2020 Nautilus
- 2013-2020 MXZ
- 2015-2020 Explorer
- 2020 Aviator/Corsair
- Equipped with multi-contour seats
- Customer symptom of intermittent multi-contour seat operation and/or massage and lumbar adjust inoperative from the seat switch or SYNC
PARTS
| Part Number | Description | Quantity | |
|---|---|---|---|
| KU2Z-14S411-FA | 2 Kits Required, 1 Kit Per Side | Pigtail Kit | 2 |
| W719352-S451 | Package Contains 4 Pieces, 4 Pieces Required, 2 Per Seat | Front Seat Bolts (Navigator Only) | 1 |
| W718633-S451 | Package Contains 4 Pieces, 4 Pieces Required, 2 Per Seat | Front Seat Bolts (Navigator Only) | 1 |
| WA-14-SBA | Package Contains 50 Pieces, 2 Pieces Required, 1 Per Seat | Zip Tie Or Equivalent, Length Of 280 mm (11 In.) | As Needed |
| NAI837X | - | Rotunda Coroplast Wiring Harness Tape Or Equivalent | As Needed |
| Obtain Locally | - | Rosin Core Mildly-activated (RMA) Solder | As Needed |
Warranty Status: Eligible under provisions of New Vehicle Limited Warranty (NVLW)/Service Part Warranty (SPW)/Special Service Part (SSP)/Extended Service Plan (ESP) coverage. Limits/policies/prior approvals are not altered by a TSB. NVLW/SPW/SSP/ESP coverage limits are determined by the identified causal part and verified using the OASIS part coverage tool.
LABOR TIMES
| Description | Operation No. | Time |
|---|---|---|
| 2015-2019 F-150, 2018-2020 Expedition: Retrieve DTCs And Install Pigtail In Both (2) Front Seats Includes Time To Remove And Install Seat (Do Not Use With Any Other Labor Operations) | 192390A | 3.5 Hrs. |
| 2017-2020 Continental, 2020 Aviator: Retrieve DTCs And Install Pigtail In Both (2) Front Seats Includes Time To Remove And Install Seat (Do Not Use With Any Other Labor Operations) | 192390B | 2.5 Hrs. |
| 2018-2020 Navigator: Retrieve DTCs And Install Pigtail In Both (2) Front Seats Includes Time To Remove And Install Seat (Do Not Use With Any Other Labor Operations) | 192390C | 2.4 Hrs. |
| 2013-2020 MKZ, 2016-2020 MKX, 2019-2020 Nautilus: Retrieve DTCs And Install Pigtail In Both (2) Front Seats Includes Time To Remove And Install Seat (Do Not Use With Any Other Labor Operations) | 192390D | 3.5 Hrs. |
| 2017-2019 F-Super Duty: Retrieve DTCs And Install Pigtail In Both (2) Front Seats Includes Time To Remove And Install Seat (Do Not Use With Any Other Labor Operations) | 192390E | 3.6 Hrs. |
| 2015-2019 Explorer: Retrieve DTCs And Install Pigtail In Both (2) Front Seats Includes Time To Remove And Install Seat (Do Not Use With Any Other Labor Operations) | 192390F | 3.3 Hrs. |
| 2020 Explorer/Corsair: Retrieve DTCs And Install Pigtail In Both (2) Front Seats Includes Time To Remove And Install Seat (Do Not Use With Any Other Labor Operations) | 192390G | 3.0 Hrs. |
REPAIR/CLAIM CODING
| Causal Part: | 14D232 |
| Condition Code: | X4 |
SERVICE PROCEDURE
- Remove the seat cover to access the SCMH and SCMG module. Refer to the Workshop Manual (WSM), Section 501-10A.
- Remove the harness shied to seat back frame retention clips and separate the plastic shield from the harness to access the circuits.
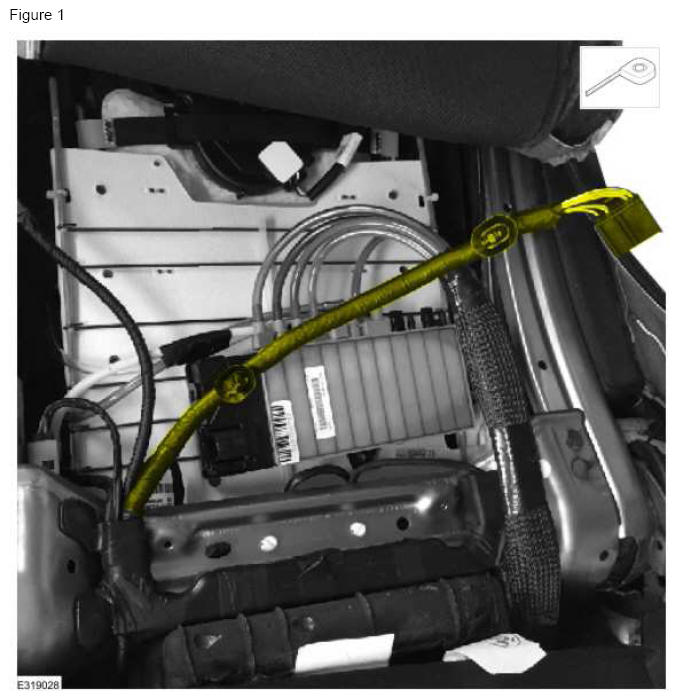
- Measure back 150 mm (5.9 in) from the edge of the plastic shield and mark the circuits to determine the cut location. The finished harness must extend a minimum of 300 mm (11.8 in) beyond the edge of the plastic shield. (Figure 1)
- The circuits for the left seat will run to the right side of the seat and the circuits for the right seat will run down toward the floor.
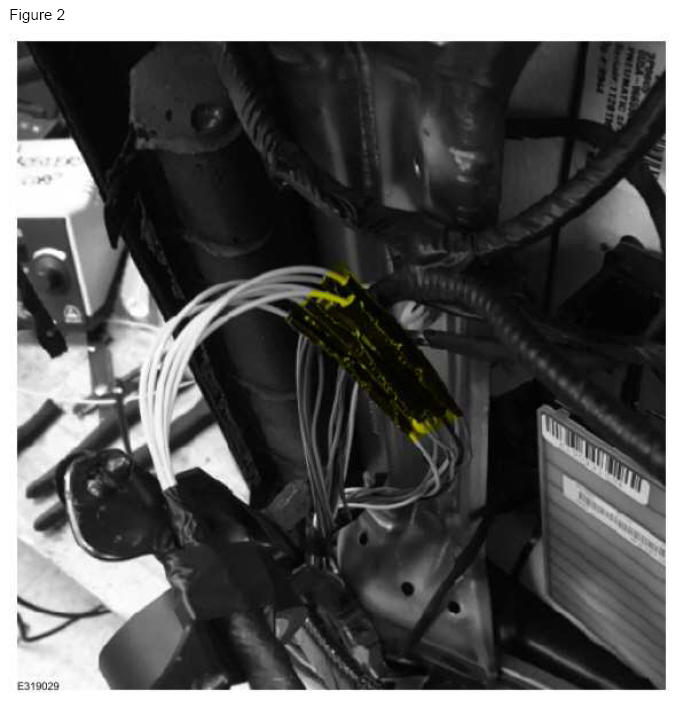
NOTE: Do not use the butt connectors included with the pigtail kit for this repair. Each circuit must be connected with solder and covered with heat shrink tubing. - Replace the harness connector with the new pigtail.
- Cut, solder, and heat shrink each circuit one at a time following the instructions included with the kit. (Figure 2)
- Wrap the new wiring with Coroplast tape or equivalent from the plastic harness shield to the connector.
- Install the plastic harness shield and secure with the 4 retention clips.
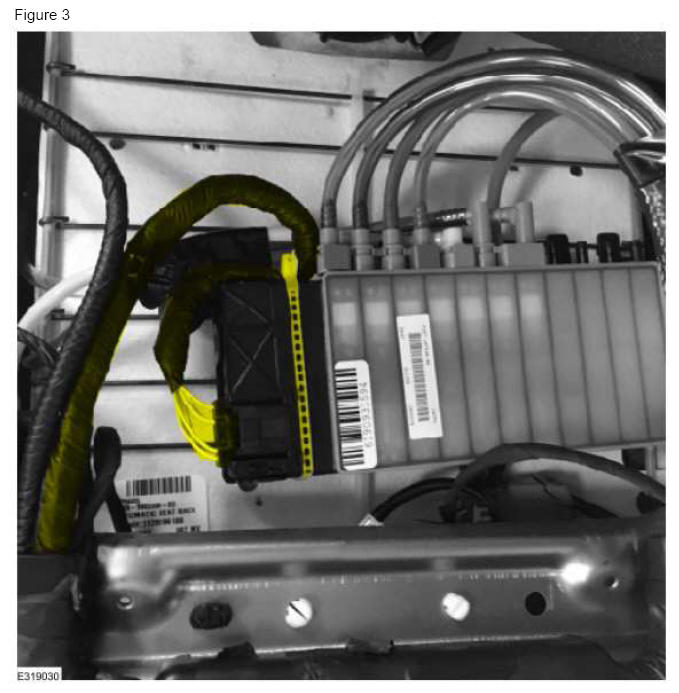
- Measure 105 mm (4.13 in) from the back for the new harness connector shell and place a mark on the new harness.
- Connect the new connector to the module and loop the harness above the module placing the mark on the harness applied in Step 7 on the top of the module next to the tube connections. (Figure 3)
- Secure the new harness to the module body using a minimum 280 mm (11 in) long zip tie.
- Reinstall the seat back cover. Refer to the WSM, Section 501-10A.