Front Window Glass Jumps/Chatters During Up/Down Travel (17-2267)
WARNING: This page is about the Explorer Base, 2.0L Eng VIN 9, which is a different variant/trim than selected.
Publication date: 2017-12-22Reference number: 17-2267
FRONT WINDOW GLASS JUMPS/CHATTERS DURING UP/DOWN TRAVEL
TECHNICAL SERVICE BULLETIN
Reference Number(s): 17-2267, Date of Issue:
December 22, 2017
| FORD: | 2011-2017 Explorer |
ISSUE
Some 2011-2017 Explorer vehicles may exhibit front window glass that jumps/chatters during up/down movement.
ACTION
Follow the Service Procedure steps to correct the condition.
PARTS
PARTS INFORMATION
| Part Number | Description | Quantity |
|---|---|---|
| W701014 S441 | Window Regulator Nut | 2 |
| JB5Z- 7821596-A | Upper Glass Run - Right Side | 1 |
| JB5Z- 7821597-A | Upper Glass Run - Left Side | 1 |
| JB5Z- 7823208-A | Window Regulator - Right Side | 1 |
| JB5Z- 7823209-A | Window Regulator - Left Side | 1 |
| JB5Z- 7821410-A | Door Glass, Base/Police - Right Side | 1 |
| JB5Z- 7821411-A | Door Glass, Base/Police - Left Side | 1 |
| JB5Z- 7821410-B | Door Glass, XLT/Sport/Limited/Platinum - Right Side | 1 |
| JB5Z- 7821411-B | Door Glass, XLT/Sport/Limited/Platinum - Left Side | 1 |
| GB5Z-14630-A | Wire Harness, Police - Right Side | 1 |
| GB5Z-14631-A | Wire Harness, Police - Left Side | 1 |
| GB5Z-14630-B | Wire Harness, Base - Right Side | 1 |
| GB5Z-14631-B | Wire Harness, Base - Left Side | 1 |
| GB5Z-14630-C | Wire Harness, XLT - Right Side | 1 |
| GB5Z-14631-C | Wire Harness, XLT - Left Side | 1 |
| GB5Z-14630-D | Wire Harness, Sport 400A - Right Side | 1 |
| GB5Z-14631-D | Wire Harness, Sport 400A - Left Side | 1 |
| JB5Z-14630-A | Wire Harness, Sport 401A/Limited/Platinum - Right Side | 1 |
| JB5Z-14631-A | Wire Harness, Sport 401A/Limited/Platinum - Left Side | 1 |
| JB5Z-78237A04-A | Water shield - Right Side | 1 |
| JB5Z-78237A05-A | Water shield - Left Side | 1 |
| JB5Z-9923394-A | Window Motor, 2011-2015 and 2016-2017 Less Memory Seats - Right Side | 1 |
| JB5Z-9923395-A | Window Motor, 2011-2015 and 2016-2017 Less Memory Seats - Left Side | 1 |
| JB5Z-9923394-B | Window Motor, 2016-2017 with Memory Seats - Right Side | 1 |
| JB5Z-9923395-B | Window Motor, 2016-2017 with Memory Seats - Left Side | 1 |
| PM-13-A | Motorcraft® Anti-Corrosion Coating | 1 |
| Obtain Locally | Clear Packaging Tape | 1 |
Warranty Status: Eligible Under Provisions Of New Vehicle Limited Warranty Coverage Warranty/ESP coverage limits/policies/prior approvals are not altered by a TSB. Warranty/ESP coverage limits are determined by the identified causal part and verified using the OASIS part coverage tool.
LABOR TIMES
LABOR TIMES
| Description | Operation No. | Time |
|---|---|---|
| 2011-2017 Explorer Without Memory Seats: Replace Window Components Following The Service Procedure Includes Time To Modify Door (Do Not Use With Any Other Labor Operations) | 172267A | 2.2 |
| 2016-2017 Explorer With Memory Seats: Replace Window Components Following The Service Procedure Includes Time To Modify Door And Reprogram Door Modules (Do Not Use With Any Other Labor Operations) | 172267B | 2.4 |
REPAIR/CLAIM CODING
REPAIR/CLAIM CODING
| Causal Part: | 7823209 |
| Condition Code: | 42 |
TOOL LIST
TOOL LIST
| Drive | Tool Name |
|---|---|
| 1/4" | Power Tool |
| 1/4" | Ratchet |
| 1/4" | Torque Wrench |
| 1/4" | 4" Extension |
| 1/4" | 10 mm Deep Socket |
| 1/4" | 10 mm Magnetic Socket |
| 1/4" | Torx® T-20 Socket |
| Drill | |
| 9 mm Drill Bit | |
| 6.5 mm Drill Bit | |
| Hammer | |
| Center Punch | |
| Small Pick | |
| Pocket Flat Head Screwdriver | |
| Ruler | |
| Digital Caliper | |
| Marking Tool | |
| Small Needle Nose Pliers | |
| Trim Tools |
SERVICE PROCEDURE
- Remove the front window regulator and motor. Refer to Workshop Manual (WSM), Section 501-11.
- Remove the front door glass. Refer to WSM, Section 501-11.
- Remove the front door glass top run. Refer to WSM, Section 501-11.
- Disconnect and remove the front door wiring harness.
- Locate and drill the new regulator hole.
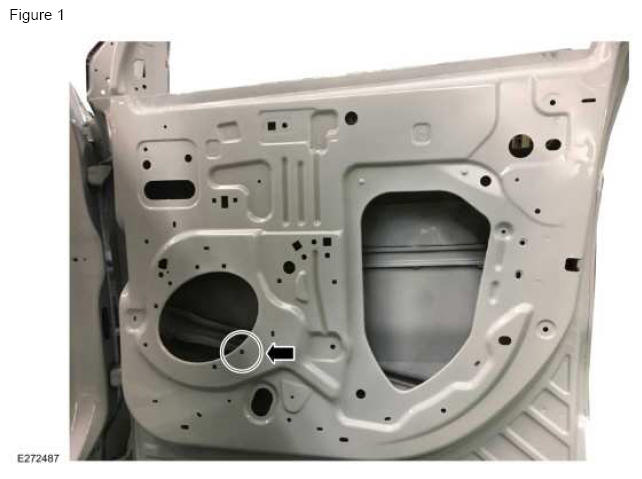
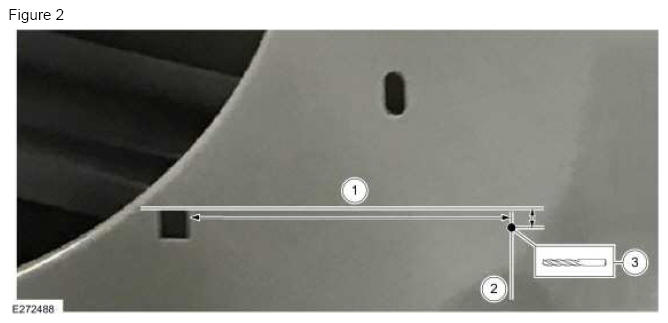
- Place a ruler horizontally along the top edge of square hole shown in Figure 1 draw a line 65 mm (2.5 inch) long. Refer to 1 in Figure 2. (Figure 1-2)
- Measure 46 mm (1.8 inch) from the door latch side edge of the square hole and place a vertical mark at the intersection of the horizontal line drawn in Step 1. Refer to 2 in Figure 2. (Figure 2)
- Measure down 2 mm (.08 inch) from the horizontal line along the vertical line and place a mark. Refer to 3 in Figure 2. (Figure 2)
- Place a centering mark at the location marked in Step 3 using a hammer and center punch and drill a 9 mm (.35 inch) diameter hole.
- Locate and drill the new wiring harness retention clip hole.
- Place a straight edge vertically along the edge of the large stamped regulator access opening in the door on the door hinge side of the opening and draw a line that extends to the bottom of the stamped opening. (Figure 3)
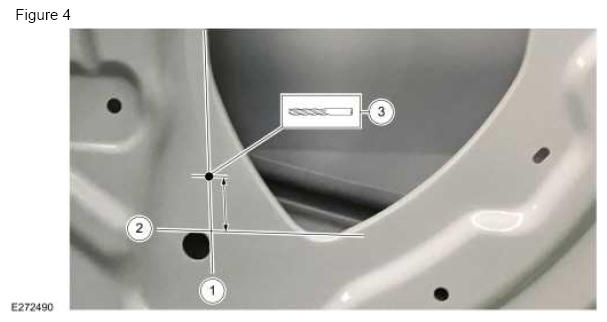
- Place the straight edge horizontally along the lowest point of the stamped opening and across the top of the round hole towards the door hinge side of the door and draw a line between the bottom of the stamped opening and the hole. Refer to 2 in Figure 4. (Figure 4)
- Measure up 32 mm (1.25 inch) from the horizontal line along the vertical line and place a centering mark using a center punch and hammer. Drill a 6.5 mm (.25 inch) diameter hole. Refer to 3 in Figure 4. (Figure 4)
- Apply Motorcraft® Anti-Corrosion Coating to all drilled holes.
- Print and cut out the information label.
- To install the new wiring harness, door glass top run, door glass, window regulator, window motor, water shield, and door trim panel, reverse the removal procedure.
- Repeat steps 1- 8 on the other front door.
- Is the vehicle a 2016 or 2017 and equipped with Memory Seats?
- Yes - reprogram the driver and passenger door modules using Integrated Diagnostic System (IDS) or Ford J2534 Diagnostic Software (FJDS) release 108.01 or higher. Make sure you are connected to the internet when entering module programming to obtain the latest updates. Calibration files may also be obtained at www.motorcraftservice.com.
- No - repair is complete.