Window Glass - Rear: Installation
- 1.
Dry fit the liftgate window glass to the existing urethane adhesive bead on the body pinch weld.- For a uniform fit, use the 2 liftgate window glass alignment pins to align the liftgate window glass in the opening.
- Use a non-permanent pencil to make alignment marks on the liftgate window glass and body to aid in the installation alignment of the liftgate window glass.
NOTE:
For additional material guidelines, refer to the manufacturer's installation information.
- 3.
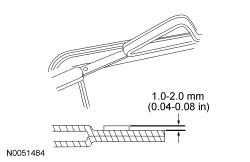
Using an appropriate tool, trim the urethane adhesive leaving a 1 mm (0.04 in) to 2 mm (0.08 in) base of original equipment urethane adhesive on the pinch weld.
NOTE:
Avoid scratching the pinch weld. Repair all minor scratches or exposed metal on the pinch weld following manufacturer's instructions. Use the same brand pinch weld primer, glass primer and urethane adhesive.
WARNING:
Repair any corrosion found on the pinch weld. The pinch weld is a structural component of the vehicle. Corrosion left unrepaired may reduce the structural integrity of the vehicle. Failure to follow this instruction may result in serious injury to vehicle occupant(s).
- 7.
If installing a new liftgate window glass, apply glass primer according to the manufacturer's instructions. Allow at least 6 minutes to dry.
NOTE:
Be sure to use the same brand and cure-rate products for the urethane adhesive and glass primer. Do not mix different brands of urethane adhesive and glass primer. REFER to Glass, Frames and Mechanisms , Material(s).
- 9.
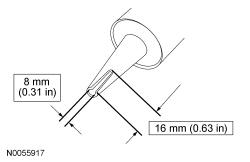
Apply urethane adhesive on top of the existing trimmed urethane adhesive bead on the pinch weld, starting and ending at the bottom of the liftgate window glass opening near the center, making sure there are no gaps in the bead.
NOTE:
Use either a high-ratio, electric or battery-operated caulk gun that will apply the urethane adhesive with less effort and continuous bead.
- 10.
Install the liftgate window glass on the vehicle using the alignment pins (if equipped) or the alignment marks made previously.
NOTE:
Before positioning the rear quarter glass, open vehicle windows to prevent the air pressure of closing doors from affecting the urethane adhesive bond.
WARNING:
Improper curing of the urethane adhesive may adversely affect glass retention, which is important for restraint system performance during a crash. Carefully follow the urethane adhesive manufacturer's curing instructions. Do not drive the vehicle until the urethane adhesive seal has cured. Failure to follow these instructions may result in serious injury to vehicle occupant(s) during a crash.
- 11.
After the urethane adhesive has cured, check the liftgate window glass seal for air or water leaks through the urethane adhesive bead and add urethane adhesive as necessary.
NOTE:
The urethane adhesive must cure for a minimum of one hour before testing for air or water leaks.
- 13.
Install the liftgate spoiler. REFER to Exterior Trim and Ornamentation .
- 14.
Install the rear wiper motor. REFER to Wipers and Washers .