Customer Satisfaction Program 17N04 Certain 2014-2015 Explorer And 2014-2016 Police Interceptor Utility Vehicles Front Door Trim Panel Repair (17N04)
Reference number: 17N04
CUSTOMER SATISFACTION PROGRAM 17N04 CERTAIN 2014-2015 EXPLORER AND 2014-2016 POLICE INTERCEPTOR UTILITY VEHICLES FRONT DOOR TRIM PANEL REPAIR
SERVICE CAMPAIGN BULLETIN
| FORD: | 2014-2015 Explorer; 2014-2016 Police Interceptor Utility |
CUSTOMER SATISFACTION PROGRAM 17N04
SUBJECT
Certain 2014-2015 Explorer and 2014-2016 Police Interceptor Utility Vehicles Front Door Trim Panel Repair
PROGRAM TERMS
This program extends the warranty coverage of the front door trim panel to 5 years of service or 100,000 miles from the warranty start date of the vehicle, whichever occurs first. This is a one-time repair program. If a vehicle has already exceeded either the time or mileage limits, this extended warranty coverage will last through November 30, 2018. Coverage is automatically transferred to subsequent owners.
VEHICLES COVERED BY THIS PROGRAM
| Vehicle | Model Year | Assembly Plant | Build Dates |
|---|---|---|---|
| Explorer | 2014-2015 | Chicago | February 18, 2013 through May 8, 2015 |
| Police Interceptor Utility | 2014-2016 | February 18, 2013 through February 13, 2016 |
Affected vehicles are identified in OASIS.
REASON FOR PROVIDING EXTENDED WARRANTY COVERAGE
In some of the affected vehicles, the driver or passenger front door trim panel cover material could separate at the top of the panel by the window.
SERVICE ACTION
If an affected vehicle exhibits this condition, dealers are to remove and repair both front door trim panels. This service must be performed at no charge to the vehicle owner.
OWNER NOTIFICATION MAILING SCHEDULE
Owner Letters are expected to be mailed the week of November 20, 2017. Dealers should repair any affected vehicles that experience front door trim panel cover material separation, whether or not the customer has received a letter.
ATTACHMENTS
Attachment I: Administrative Information
Attachment II: Labor Allowances and Parts Ordering Information
Attachment III: Technical Information
Owner Notification Letter
QUESTIONS & ASSISTANCE
For questions and assistance, contact the Special Service Support Center (SSSC) via the SSSC Web Contact Site. The SSSC Web Contact Site can be accessed through the Professional Technician Society (PTS) website using the SSSC link listed at the bottom of the OASIS VIN report screen or listed under the SSSC tab.
Sincerely,

Michael A. Berardi
ATTACHMENT I
OASIS ACTIVATION
OASIS will be activated on November 7, 2017.
FSA VIN LISTS ACTIVATION
FSA VIN Lists will not be activated for this service action.
SOLD VEHICLES
- Only owners with affected vehicles that exhibit the covered condition will be directed to dealers for repairs.
- Dealers are to prioritize repairs of customer vehicles over repairs of new and used vehicle inventory.
STOCK VEHICLES
- Do not perform this program unless the affected vehicle exhibits the covered condition.
TITLE BRANDED / SALVAGED VEHICLES
Vehicles with cancelled warranties are not eligible for this service action.
ADDITIONAL REPAIR (LABOR TIME AND/OR PARTS)
Additional repairs identified as necessary to complete the FSA should be managed as follows:
- For vehicles within new vehicle bumper-to-bumper warranty coverage, follow existing warranty and policy guidelines for related damage claims. No SSSC approval is required for these vehicles:
- Ford vehicles - 3 years or 36,000 miles
- For vehicles outside new vehicle bumper-to-bumper warranty coverage, submit an Approval Request to the SSSC Web Contact Site prior to completing the repair.
OWNER REFUNDS
- Ford Motor Company is offering a refund for owner-paid repairs covered by this program if the repair was performed before the date of the Owner Notification Letter. This refund offer expires April 30, 2018 .
- Refunds will only be provided for the cost associated with front door trim panel cover material separation.
RENTAL VEHICLES
The use of rental vehicles is not approved for this program.
CLAIMS PREPARATION AND SUBMISSION
- This is a one-time repair program and also applies to vehicles that are within the New Vehicle Limited Warranty coverage period. When a vehicle is determined to exhibit this concern, repairs should be claimed against Program Code 17N04.
- Enter claims using Direct Warranty Entry (DWE) or One Warranty Solution (OWS).
- DWE: refer to ACESII manual for claims preparation and submission information.
- OWS: when entering claims in DMS software, select claim type 31: Field Service Action. The FSA number (17N04) is the sub code.
- Additional labor and/or parts must be claimed as related damage on a separate repair line from the FSA.
- Submit refunds on a separate repair line.
- Program Code: 17N04
- Misc. Expense: ADMIN
- Misc. Expense: REFUND
- Misc. Expense: 0.2 Hrs.
- Multiple refunds should be submitted on one repair line and the invoice details for each repair should be detailed in the comments section of the claim.
- Provision for Locally Obtained Supplies:
Procedure specifies the use of 3/8" crown, 3/16" leg length staples. About 80 to 100 staples will be used per vehicle. One box can repair multiple vehicles. Submit on the same repair line as the repair.
- Program Code: 17N04
- Misc. Expense: OTHER
- Misc. Expense: Claim Actual Cost up to $2.00
ATTACHMENT II
LABOR ALLOWANCES
| Description | Labor Operation | Labor Time |
|---|---|---|
| Remove and staple both front door trim panels | 17N04B | 0.6 Hours |
PARTS REQUIREMENTS / ORDERING INFORMATION
| Part Number | Description | Order Quantity | Claim Quantity |
|---|---|---|---|
| Rotunda RTTP SNS87003SS or Obtain Locally | 3/8" crown, 3/16" leg length staples (approximately 40-50 staples required per front door trim panel, 80-100 staples required per vehicle repair) | Claim as Misc. Expense: OTHER | |
ATTACHMENT III
CERTAIN 2014-2015 EXPLORER AND 2014-2016 POLICE INTERCEPTOR UTILITY VEHICLES - FRONT DOOR TRIM PANEL REPAIR
OVERVIEW
In some of the affected vehicles, the driver or passenger front door trim panel cover material could separate at the top of the panel by the window. If an affected vehicle exhibits this condition, dealers are to remove and repair both front door trim panels.
To view a video demonstration of this repair procedure, click the video icon.
SERVICE PROCEDURE
Recommended Tool List:
| General Tools | General Equipment |
|---|---|
| 3/8" Drive 7mm Socket | Straight Edge (Rotunda 164-R2760 or equivalent) |
| 3/8" Drive 10mm Socket | Pneumatic Staple Gun - to apply 3/8" crown staples (Rotunda RTTP SNSJS7116LN, Kit SNSU502DT-PKG, or equivalent) |
| 3/8" Drive Impact Gun | 3/8" crown, 3/16" leg length staples (Rotunda RTTP SNS87003SS, or equivalent) |
| 3/8" Drive Ratchet | |
| 3/8" Drive Extension 3" (76 mm) | |
| Pocket Flathead Screwdriver | |
| Plastic Trim Tool | |
| Needle Nose Pliers |
- Remove both front door trim panels. Please follow the WSM procedures in Section 501-05.
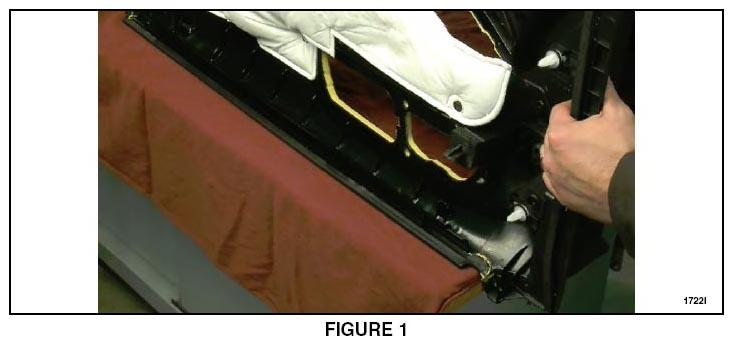
- Place the door trim panel upside down on a bench with the mirror sail end hanging over the edge of the bench. Cover the bench as needed to protect the door trim panel. See Figure 1.
- Roll the lip of the door trim cover material back into place using a straight edge to ensure a smooth even surface. See Figure 2.
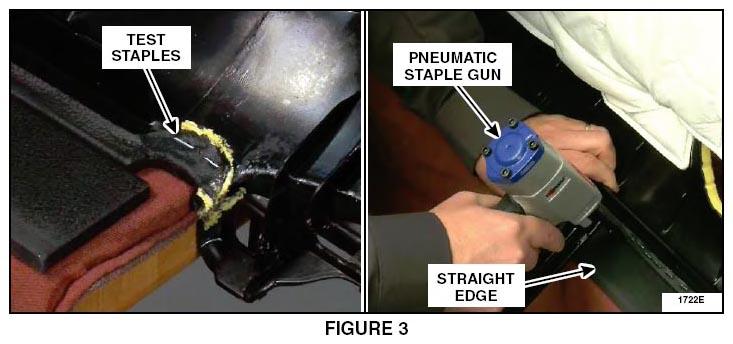
- Using a 3/8" crown, 3/16" leg staple and a pneumatic staple gun regulated at 60 psi, staple the upper edge of the door trim cover material to the substrate on both front door trim panels. The use of an assistant will be needed to hold the door trim panel in place during the stapling procedure.
- Place a couple of test staples at the end of the door trim panel in the area of the mirror sail and adjust air pressure as needed so the staple does not go through the fabric and sits flush. See Figure 3.
- Starting from the center and working outward, place staples approximately 1/4" (6 mm) apart. See Figure 3.
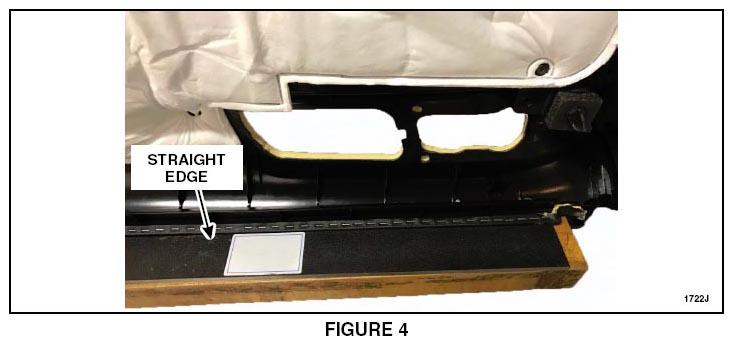
- Return to the center of the panel and work outward in the opposite direction so the entire panel is stapled across the top edge of the panel. See Figure 4.
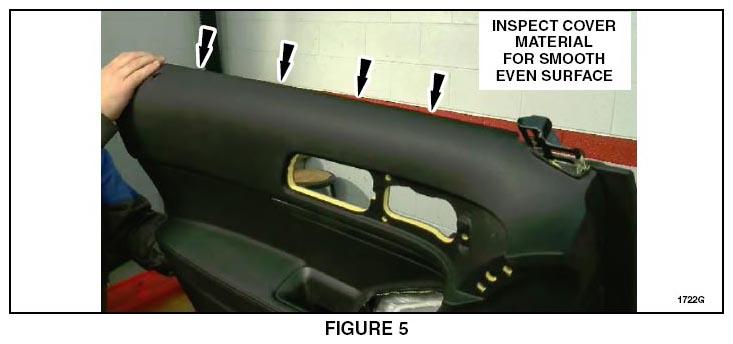
- Place the panel upright and inspect the cover material for a smooth even surface. See Figure 5.
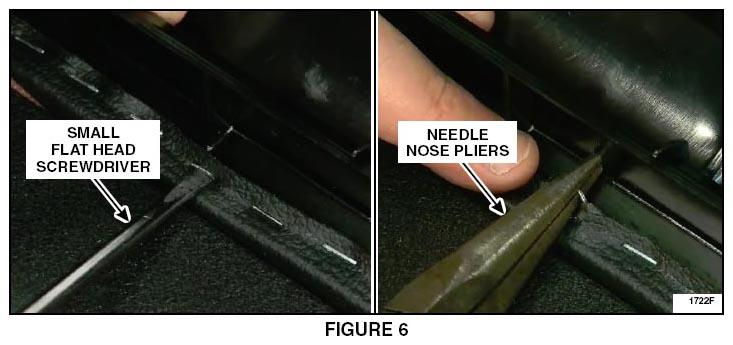
- If sections of the cover material are wavy following inspection, or staples have pressed through the cover material, remove any staples or section of staples using a small flat head screw driver and needle nose pliers and re-staple as needed. See Figure 6.
- Install both front door trim panels. Please follow the WSM procedures in Section 501-05.