Removal And Installation: Installation
To avoid serious or fatal injury on vehicles equipped with airbags, disable the Supplemental Restraint System (SRS) before attempting any steering wheel, steering column, airbag, seat belt tensioner, impact sensor, or instrument panel component diagnosis or service. Disconnect and isolate the battery negative (ground) cable, then wait two minutes for the system capacitor to discharge before performing further diagnosis or service. This is the only sure way to disable the SRS. Failure to take the proper precautions could result in accidental airbag deployment.
To avoid serious or fatal injury, never strike or drop the side impact sensor, as it can damage the impact sensor or affect its calibration. The side impact sensor enables the system to deploy the side Supplemental Restraint System (SRS) components. If an impact sensor is accidentally dropped during service, the sensor must be scrapped and replaced with a new unit. Failure to observe this warning could result in accidental, incomplete, or improper side SRS component deployment.
The service power sliding door drive assembly does not include the Power Sliding Door Control Module (PSDM). The PSDM must be transferred from the original drive assembly to the new service part. for the PSDM installation procedure. Refer to MODULE, DOOR, POWER SLIDING (PSDML/PSDMR), REMOVAL AND INSTALLATION .

- Properly position the power sliding door drive unit (2) and control module (1) to the power sliding door track (3).
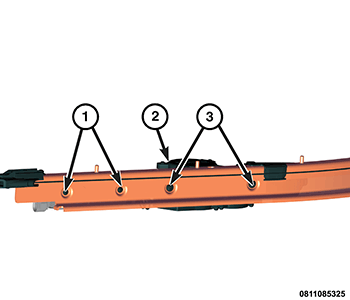
- Using two fasteners (1), secure the power sliding door module to the power sliding door track.
- Using two fasteners (3), secure the power sliding door drive unit (2) to the power sliding door track.
- Connect the wiring harness connection between the power sliding door module and the power sliding door drive unit.
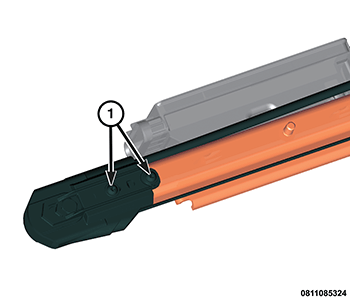
- At each end of the power sliding door track, position and fit the power sliding door drive unit pulleys. Using two screws (1), tightly fasten the pulleys to the track.
- Position the power sliding door track with module and drive unit close enough to the installed position to the vehicle in order to connect the wiring harness connections to both the power sliding door module and the power sliding door drive unit.
- Once the harnesses have been connected, fit the power sliding door track, module and drive unit to the body paying attention to positioning in order to line up the fasteners with the access holes when looking down through the body harness wiring trough.
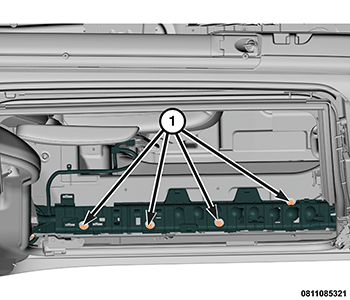
- Install four (1) nuts to secure the sliding door track assembly to the body.
- Cover the nut access holes (1) with tape or similar material in order to prevent contaminants.
- Install both the front and rear power sliding door scuff sill plates.
- Install the power sliding door to the vehicle. Refer to DOOR, SLIDING, REMOVAL AND INSTALLATION .
- Perform the Supplemental Restraint System (SRS) verification test procedure due to removal of the second row seating side impact sensor. Refer to STANDARD PROCEDURE .
- Perform the power sliding door learn cycle and verify proper system operation. Refer to POWER SLIDING DOOR LEARN CYCLE .