Removal And Installation: Installation
Any time a sensor is to be reinstalled in a wheel, a new valve stem assembly must be installed to ensure air tight sealing.
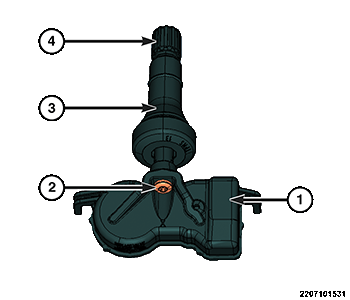
When installing a new valve stem (3), do not install it with the sensor (1) attached. If it is a new sensor, separate the valve stem from the sensor first then install the components separately.
Replace the valve stem (2) assembly with each tire change or when the tire is removed from the wheel.
- Wipe the area clean around sensor/valve stem mounting hole in wheel. Make sure surface of wheel is not damaged.NOTE:
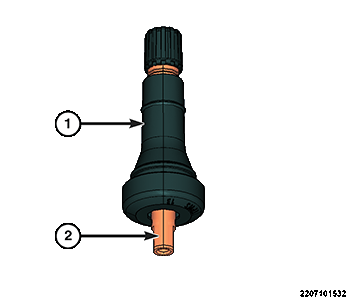
When installing a new valve stem (1), water or water/soap solution should be used for proper installation into the wheel.
- Position the valve stem (1) into the wheel mounting hole with the flats (2) at a 90° angle to the wheels lip, then pull through to seat with a standard valve stem installation tool.
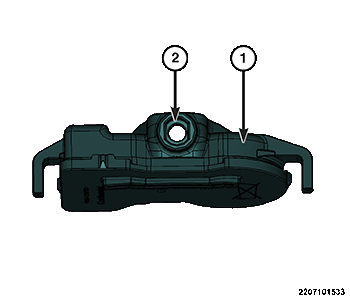
- Install the sensor (1) onto the valve stem by aligning the flats in the sensor (2) to the flats on the valve stem.
- Install and secure the tire pressure sensor to valve stem mounting fastener (2).NOTE:
When dismounting or mounting the tire on the wheel, follow the tire changer manufacturers instructions while paying special attention to avoid damaging the pressure sensor.
- Mount tire on wheel and install tire and wheel assembly on the vehicle. Refer to REMOVAL AND INSTALLATION .
- Adjust air pressure to that listed on Tire Inflation Pressure Label (Placard) provided with vehicle (usually applied to driver's side B-pillar). Make sure original style valve stem cap is securely installed to keep moisture out of sensor.
- Remove the support and lower the vehicle.
- Perform one of the following to make the system learn the new sensor ID:
- Use the TPM-RKE Analyzer, 9936, with the Scan Tool to program the RF Hub module with the tire pressure sensor ID. This is part of the TPM Diagnostic Verification Test. Refer to STANDARD PROCEDURE .
- Once the vehicle has remained stationary for more than 20 minutes, drive vehicle for a minimum of 20 minutes while maintaining a continuous speed above 20 mph (32 km/h). During this time, the system will learn the new sensor ID. This is part of the TPM Diagnostic Verification Test. Refer to STANDARD PROCEDURE .
If a sensor cannot be trained, refer to appropriate diagnostic information.