Removal And Installation: Left: Installation
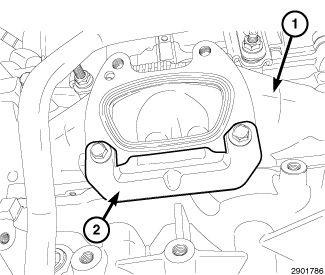
- If removed, position a new exhaust gasket onto the manifold flange and install the lower retainer plate (2). Loosely install all four bolts to align the gasket. Tighten the lower retainer bolts (2) to the proper specifications. Refer to TECHNICAL SPECIFICATIONS .
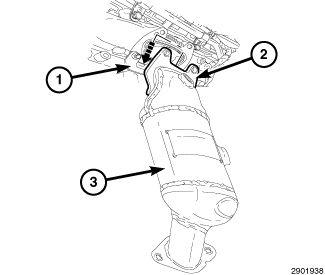
- Position the catalytic converter (3) against the exhaust manifold. Position the converter flange (2) to the retainer (1).
- Install the upper flange bolts and tighten to the proper torque specifications. Refer to TECHNICAL SPECIFICATIONS .
- Install the exhaust cross-under pipe and belly pan. Refer to PIPE, EXHAUST CROSSUNDER, REMOVAL AND INSTALLATION .
- Remove the support and lower the vehicle.
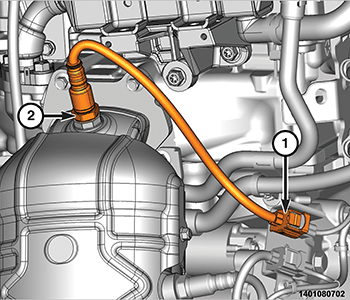
- Install the left side downstream oxygen sensor (2) and tighten to the proper torque specifications. Refer to FUEL INJECTION, GAS, TECHNICAL SPECIFICATIONS
.NOTE:
If reinstalling the original oxygen sensors, coat the sensor threads with an anti-seize compound such as Loctite 771- 64 or equivalent. New sensors have compound on the threads and do not require an additional coating. Do Not add any additional anti-seize compound to the threads of a new oxygen sensor.
- Connect the left side downstream oxygen sensor wire harness connector (1).
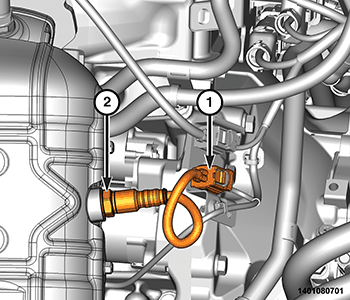
- Install the left side upstream oxygen sensor (2) and tighten to the proper torque specifications. Refer to FUEL INJECTION, GAS, TECHNICAL SPECIFICATIONS
.NOTE:
If reinstalling the original oxygen sensors, coat the sensor threads with an anti-seize compound such as Loctite 771- 64 or equivalent. New sensors have compound on the threads and do not require an additional coating. Do Not add any additional anti-seize compound to the threads of a new oxygen sensor.
- Connect the left side upstream oxygen sensor wire harness connector (1).
- Connect the negative battery cable.
- Start the engine and inspect for exhaust leaks. Repair exhaust leaks as necessary.
- Check the exhaust system for contact with the body panels. Make the necessary adjustments, if needed.