With Intermediate Shaft: Installation
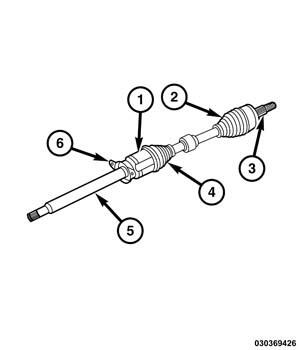
Never Handle The Half Shaft Assembly By The Inner Or Outer Boots (2 And 4). This Can Cause Damage To The Boot, Which Will Allow Contaminants To Enter The Constant Velocity (Cv) Joint.
The Inner Tripod Joint (1) Is Designed With A Retention Feature That Prevents The Tripod Rollers From Coming Out Of The Inner Joint Housing Up To A Specific Load. If This Feature Is Overcome And The Rollers Are Pulled Past The Retention Feature The Joint Will Lock Up And No Longer Function Properly. The Entire Half Shaft Assembly (3) Must Be Replaced If This Occurs.
- Raise And Support The Vehicle. Refer To Hoisting, Standard Procedure .
- Position The Halfshaft Under The Vehicle And Over The Lower Control Arm.NOTE:
Lightly Apply Grease To The Splines Prior To Installation.
- Slip The Halfshaft Into The Differential Seal And Lightly Twist Until Intermediate Shaft Slides All The Way Into The Differential.
- Swing The Steering Knuckle Outward And Engage The Halfshaft End Into The Hub Bearing Spline.
- Push The Lower Control Arm Downward Until Ball Joint Stud Can Enter The Bottom Of The Knuckle.
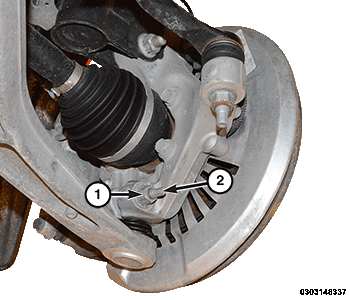
- Install A New
Lower Ball Joint Pinch Bolt (2) And Nut (1) And Tighten To The Proper Torque Specifications. Refer To Front, Technical Specifications
.
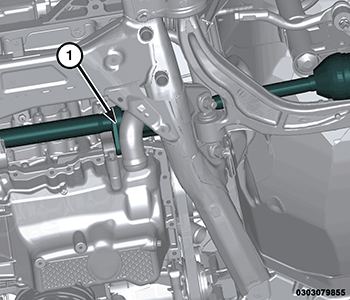
- Position The Halfshaft/Intermediate Shaft Assembly (1) In The Vehicle.
- Install The Intermediate Bracket To The Engine Block Bolts (1) And Tighten To The Proper Torque Specifications. Refer To torque Specifications .
- If Equipped, Install The Engine Belly Pan. Refer To Belly Pan, Engine, Removal And Installation
.NOTE:
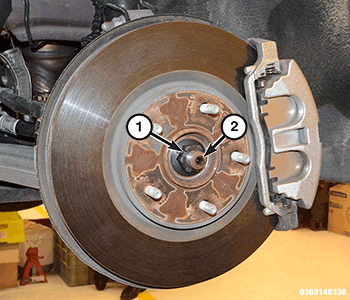
Always Install A New Hub Nut. The Original Hub Nut Is One Time Use Only And Must Be Discarded When Removed.
CAUTION:An Over-Torque Of The Axle Hub Nut May Cause Front Halfshaft Failure. The Axle Hub Nuts Are A One-Time Use And Should Be Not Be Re-Torqued Or Reused. If An Over-Torque Condition Has Occurred, The Axle Hub Nut And Axle Halfshaft Must Be Replaced.
- Install A New Hub Nut (1) And While A Helper Applies The Brakes, Tighten The Hub Nut To The Proper Torque Specifications. Refer To torque Specifications .
- Install The Tire And Wheel Assembly. Refer To Removal And Installation .