Outer Tie Rod
- Raise and support the vehicle. Refer to HOISTING, STANDARD PROCEDURE .
- Remove the front wheels. Refer to REMOVAL AND INSTALLATION .
- Install two standard wheel mounting nuts, flat side to rotor, diagonally opposite to each on the rotor.
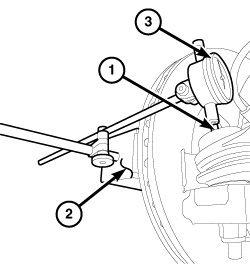
- Attach a magnetic dial indicator (2) to the inside or outside of the brake rotor, then align the dial indicator's contact pointer (1) with the direction of the stud axis and touch the outer tie rod.
- Zero the dial indicator. (3)NOTE:
When checking free-play, DO NOT rotate the tie rod. Just because a tie rod rotates easily does not mean that it is necessarily faulty. Using more than light hand pressure will result in a false reading.
- Grasp the outer tie rod near the ball stud and attempt to move the tie rod straight up and down using light hand pressure. (Less than 10 lbs. of force.)
- Measure and record any tie rod free-play movement.
- Remove the magnetic dial indicator.
- Remove the standard wheel mounting nuts from the two studs.

If the free-play in the tie rod exceeds 0.05 mm (.002 in.), replace the outer tie rod. Refer to TIE ROD, STEERING, REMOVAL AND INSTALLATION . If the free-play is less than 0.05 mm (.002 in.) at the outer tie rod check the inner tie rod for free-play. Refer to TIE ROD, STEERING, DIAGNOSIS AND TESTING .