Inner Tie Rod End: Installation
NOTE:
If replacing right side inner tie rod repeat steps 4-8 for the left side inner tie rod.
NOTE:
The bellows and clamps are not reusable and must be discarded if removed.
- Apply Mopar® Lock and Seal Adhesive or equivalent medium thread locker adhesive to inboard end thread of inner tie rod.
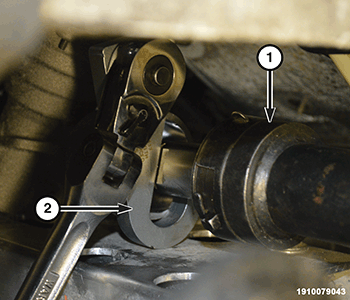
- Install the inner tie rod, then install the EPS steering rack holder (special tool #10417, Holder, EPS Steering Rack) (2) on the LH inner tie rod. Using a suitable tool (1), tighten to the proper torque specifications. Refer to TECHNICAL SPECIFICATIONS .
- Apply a small amount of Mopar® Lubriplate, or equivalent in the recessed area of the inner tie rod where the small end of the boot attaches.
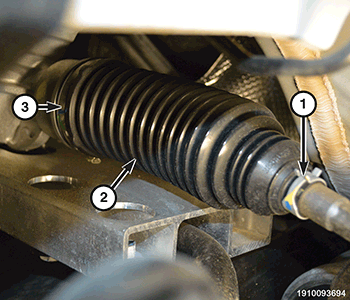
- Position the large clamp (3) on the boot (2) and install the boot over the inner tie rod and rack.
- Engage the small end of boot (1) in the groove and install the small clamp (1) on the boot.
- Install the jam nut to the inner tie rod end.NOTE:
The toe adjustment must be performed after installing the outer tie rod.
- Install the outer tie rod. Refer to TIE ROD, STEERING, REMOVAL AND INSTALLATION .