Removal And Installation: Removal
To avoid serious or fatal injury on vehicles equipped with airbags, disable the Supplemental Restraint System (SRS) before attempting any steering wheel, steering column, airbags, airbag curtains, knee blocker, seat belt tensioner, impact sensor or instrument panel component diagnosis or service. Disconnect the Intelligent Battery Sensor (IBS)/negative battery cable assembly from the negative battery post, then wait two minutes for the system capacitor to discharge before performing further diagnosis or service. This is the only sure way to disable the SRS. Failure to take the proper precautions could result in accidental airbag deployment.
To avoid serious or fatal injury when removing a deployed airbag, rubber gloves, eye protection, and a long-sleeved shirt should be worn. There may be deposits on the airbag unit and other interior surfaces. In large doses, these deposits may cause irritation to the skin and eyes.
To avoid serious or fatal injury, use extreme care to prevent any foreign material from entering the passenger airbag, or from becoming entrapped between the airbag cushion and the deployment door. Failure to observe this warning could result in occupant injuries upon airbag deployment.
To avoid serious or fatal injury, the instrument panel cover must never be painted. Replacement covers are serviced in the original colors. Paint may change the way in which the material of the cover responds to an airbag deployment. Failure to observe this warning could result in occupant injuries upon airbag deployment.
The following procedure is for replacement of an ineffective or damaged Passenger AirBag (PAB). If the airbag is ineffective or damaged, but not deployed, review the recommended procedures for Handling Non-Deployed Supplemental Restraints. Refer to STANDARD PROCEDURE . If the PAB has been deployed, review the recommended procedures for Service After A Supplemental Restraint Deployment before removing the airbag from the vehicle. Refer to STANDARD PROCEDURE .
- Disconnect and isolate the negative battery cable. If equipped with an Intelligent Battery Sensor (IBS), disconnect the IBS connector first before disconnecting the negative battery cable. Wait 2 minutes for the system capacitor to discharge before continuing service.
- Remove the glove box from the instrument panel. Refer to GLOVE BOX, INSTRUMENT PANEL, REMOVAL AND INSTALLATION
.
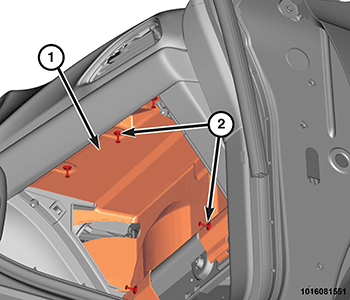
- Remove the glovebox closeout panel (1) retainers (2) from the glovebox closeout panel.
- Remove the glovebox closeout panel (2) from the instrument panel.
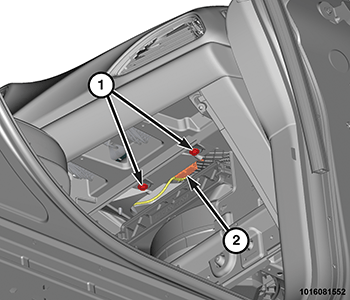
- Reach through the instrument panel glove box opening to access and remove the fasteners (1) that secure the PAB lower mounting bracket to the instrument panel structural support.
- Reach through the instrument panel glove box opening to access and disconnect the instrument panel wire harness connector (2) from the PAB jumper wire harness connector.
- Remove the instrument panel cover. Refer to COVER, INSTRUMENT PANEL, REMOVAL AND INSTALLATION
.
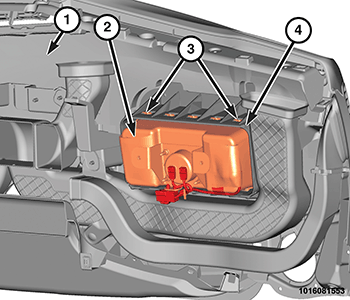
- Remove the PAB (2) and instrument panel cover (1) as a unit from the instrument panel structural support.
- Place the instrument panel cover on a suitable work surface with the top facing down. If the cover will be reused, be certain to take the proper precautions to prevent the cover from receiving cosmetic damage during the following procedures.
- Disengage each of the retainers (3) on one side of the PAB housing from the windows in the forward or rearward vertical walls of the PAB chute (4) on the underside of the cover. To disengage the retainers, use a suitable prying tool to pull the upper edge of the receptacle wall outward far enough to disengage the hooks on the adjacent edge of the PAB chute.
- With all of the retainers on one side of the PAB housing disengaged from the chute, rotate that side of the housing upward far enough to disengage the retainers on the opposite side of the housing from the chute.
- With all of the retainers disengaged, lift the PAB housing, inflator and cushion as a unit from the receptacle of the PAB chute on the underside of the instrument panel cover.