A/C Compressor: Removal
WARNING:
Review the warnings and cautions for this system before performing the procedure. Failure to follow these instructions may result in serious or fatal injury.
CAUTION:
If an internal failure of the A/C compressor has occurred the A/C system must be flushed and the A/C receiver/drier filter must be replaced. Failure to flush the system and replace the A/C receiver/drier filter can cause serious damage to the replacement A/C compressor.
NOTE:
The A/C compressor may be removed and repositioned without discharging the refrigerant system or disconnecting the refrigerant lines.
- Disconnect and isolate the negative battery cable. If equipped with an Intelligent Battery Sensor (IBS), disconnect the IBS connector first before disconnecting the negative battery cable.
- Recover the refrigerant from the refrigerant system. Refer to PLUMBING, FRONT, STANDARD PROCEDURE .
- Raise and support the vehicle. Refer to HOISTING, STANDARD PROCEDURE .
- Remove the right front splash shield. Refer to SHIELD, SPLASH, FRONT WHEELHOUSE, REMOVAL AND INSTALLATION .
- Remove the accessory drive belt. Refer to BELT, SERPENTINE, REMOVAL AND INSTALLATION .
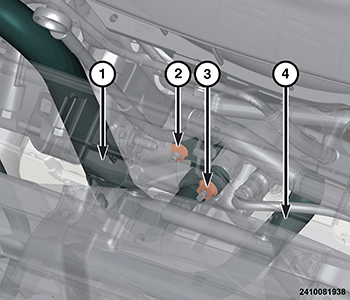
- Remove the A/C suction and liquid lines to compressor nuts (2, 3).
- Disconnect the A/C discharge and suction lines (1, 4) from the A/C compressor. Discard
the O-ring seals and gaskets.
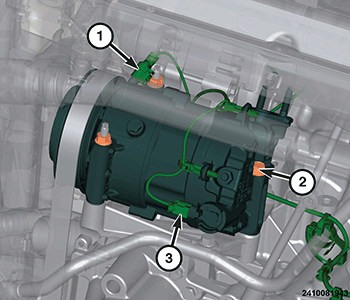
- Disconnect the A/C compressor wire harness connectors (1, 3).
- Remove the compressor to engine bolt and nuts (2).
- If required, remove the two studs.
- Remove the A/C compressor from the engine compartment.
- Install plugs in or tape over the opened refrigerant line fittings and compressor ports.