A/C Compressor: Installation
NOTE:
When replacing multiple A/C system components, see the Refrigerant Oil Capacities chart to determine how much oil should be removed from the new A/C compressor. Refer to STANDARD PROCEDURE - REFRIGERANT OIL LEVEL .
NOTE:
Replacement of the refrigerant line O-ring seals and gaskets is required anytime a refrigerant line is disconnected. Failure to replace the rubber O-ring seals and metal gaskets may result in a refrigerant system leak.
- If the A/C compressor is being replaced, the refrigerant oil in the old compressor must be first drained and measured. Then the oil in the new A/C compressor must be drained. Finally, the new compressor must be refilled with the same amount of new refrigerant oil that was drained out of the old compressor. When replacing multiple A/C system components, see the Refrigerant Oil Capacities chart to determine how much oil should be added to the refrigerant system. Refer to STANDARD PROCEDURE - REFRIGERANT OIL LEVEL . Use only refrigerant oil of the type recommended for the A/C compressor in the vehicle.
- Position the A/C compressor to the engine.
- If removed, install the two studs. Tighten the studs securely.
- Install and tighten the two bolts (3) and two nuts (4) in the following sequence:
- Install the bolt and hand tighten.
- Install nuts and hand tighten.
- Tighten upper nut to 28 N.m (21 ft. lbs.).
- Tighten lower nut to 28 N.m (21 ft. lbs.).
- Tighten bolt to 28 N.m (21 ft. lbs.).
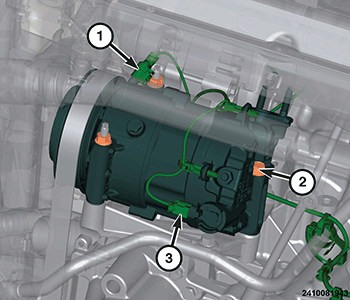
- Connect the A/C compressor wire harness connectors (1, 3).
- Remove the tape or plugs from the opened refrigerant line fittings and the compressor ports.
- Lubricate NEW rubber O-ring seals with clean refrigerant oil and install them and NEW gaskets on the refrigerant line fittings. Use only the specified O-rings as they are made of a special material for the R-1234yf system. Use only refrigerant oil of the type recommended for the A/C compressor in the vehicle.
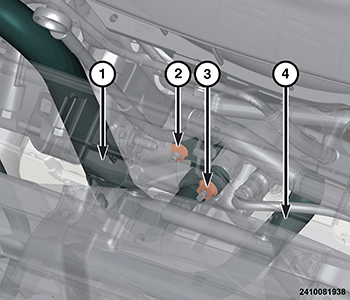
- Install the A/C suction and liquid line (1, 4) to the A/C compressor.
- Install the A/C suction and liquid lines to compressor nuts (2, 3). Tighten the nuts to the proper. Refer to TECHNICAL SPECIFICATIONS .
- Install the accessory drive belt. Refer to BELT, SERPENTINE, REMOVAL AND INSTALLATION .
- Install the right front splash shield. Refer to SHIELD, SPLASH, FRONT WHEELHOUSE, REMOVAL AND INSTALLATION .
- Remove the support and lower the vehicle.
- Connect the negative battery cable. If equipped with an Intelligent Battery Sensor (IBS), connect the IBS connector.
- Charge the refrigerant system. Refer to PLUMBING, FRONT, STANDARD PROCEDURE .