Removal And Installation: Removal
WARNING:
Review the safety precautions and warnings in this article before performing this procedure. Failure to follow these instructions may result in serious or fatal injury.
- Recover the refrigerant from the refrigerant system. Refer to PLUMBING, FRONT, STANDARD PROCEDURE .
- Disconnect and isolate the negative battery cable. If equipped with an Intelligent Battery Sensor (IBS), disconnect the IBS connector first before disconnecting the negative battery cable.
- Remove the front engine belly pan. Refer to BELLY PAN, ENGINE, REMOVAL AND INSTALLATION .
- Remove the front belly pan. Refer to BELLY PAN, FRONT, REMOVAL AND INSTALLATION .
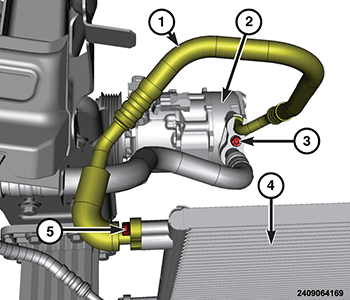
- Remove the bolt (5) that secures the A/C discharge line (1) to the condenser (4).
- Disconnect the A/C discharge line (1) from the A/C condenser (4).
- Remove the bolt (3) that secures the A/C suction line and A/C discharge line (1) to the A/C compressor (2).
- Disconnect the A/C suction line and A/C discharge line (1) from the A/C compressor (2). Separate the A/C suction line and A/C discharge line (1).
- Remove the A/C discharge line (1) from the engine compartment. Remove and discard the O-ring seals.
- Install plugs in, or tape over the open refrigerant line fittings, the condenser and compressor ports.