Standard Procedure - New Vehicle Preparation
| VEHICLE READINESS | |
|---|---|
|
NOTE:
Note: This document is for reference purposes only. The instructions are not VIN-specific, and it is not required to print or retain this document for each New Vehicle Prep performed. |
|
| Description | Action |
| Check for DTCs using wiTECH (FIAT 500 BEV and Pacifica PHEV only) | Verify no fault codes exist |
| "Charge to 100% SOC using Level 2 Charger - Complete Prep after 100% SOC (can take up to 4 hours) (FIAT 500 BEV and Pacifica PHEV only)" | Using a Level 2 Charger, charge the vehicle to 100% State-of-Charge (SOC) at your dealership charging station. When SOC is 100%, 5 LEDs will be illuminated in vehicle cluster. Charging the vehicle to 100% SOC can take up to 4 hours. Do not complete the remaining steps of New Vehicle Prep until SOC is 100%. |
| Keep All Protective Transit Film and Wheel Covers & Films on vehicle until sold, or up to 180 Days | Keep All Protective Transit Film and Wheel Covers & Films on vehicle until sold, or up to 180 Days. |
| Place vehicle into Customer Mode | Using wiTECH, place the vehicle into customer mode. |
| Inflate tire pressure to max side wall pressure (except Viper) | Increase the tire pressure to maximum sidewall pressure if vehicle is going into lot storage. |
| Verify vehicle is built as invoiced | Verify vehicle is built as invoiced |
| Install all "Shipped Loose" items (except Viper) | Install all "Shipped Loose" items.
NOTE:
FOR PACIFICA MODELS, DO NOT PLACE ANY OBJECTS IN OR AROUND THE THIRD ROW SEAT TUB (E.G. WHEEL LOCKING LUG NUTS PACKAGING). ITEMS LEFT NEAR THE THIRD ROW SEAT FOLDING PATH MAY PREVENT THE SEAT FROM STOWING PROPERLY. |
| Install Front License Plate Bracket (if required) | Install Front License Plate Bracket. |
| Perform all Incomplete Recalls and RRTs | Perform all Incomplete Recalls and RRTs |
| FF BEV and Pacifica PHEV Charge Cord Installation | "The charge cord bag will be located behind the rear seats. Remove the charge cord (EVSE) from the bag. Place the cord, handle, and housing into the cargo box. Slip the housing and handle under the elastic strap. Coil the cord and place it into the space for the cord. Remove the instruction booklet from the bag and either place with the owner's manual or place with the EVSE. Dispose of the plastic bag. " |
| UNDERHOOD | |
|---|---|
| Description | Action |
| Hood Latch and Safety Catch - Adjust as Needed | Verify the operation of the hood release system including the inside hood release lever and the outside hood secondary safety catch. Adjust if necessary. The safety catch prevents the hood from going to the full open position until it is manually released. To test the safety catch, unlatch the hood with the interior hood release lever and attempt to raise the hood without operating the safety catch. |
| Battery State-of-Charge - document voltage | Check the battery state of charge by connecting a digital voltmeter at the jump-start locations. The battery voltage should be at least 12.4 volts (Fiat 500 BEV/Pacifica PHEV -100%). If charging is necessary, follow the service information procedures and recharge the battery. Record voltage on New Vehicle Prep (NVP) form. |
| For international EMEA market vehicles, print the primary battery and/or the ESS auxiliary battery (If equipped) status check result ticket and archive it together with the New Vehicle Prep Check Sheet. Refer to Service Bulletin 08-073-17.
NOTE:
For international EMEA market vehicles the 12V lead battery and ESS auxiliary battery (If equipped) must be charged at 100% independently from the readed voltage. Record voltage on New Vehicle Prep (NVP) form. |
|
| Loose Attachments, Routing and Clearance | Inspect the following for routing, loose attachments, connections, and clearance. Reroute and tighten as required: Brake Lines, Fuel Lines, Power Steering Hoses, Vacuum Hoses, Clutch Lines, Refrigerant Lines, Wiring, Belts. |
| All Fluid Levels | Refer to the owner's manual or service information for proper fluid level inspection locations. Vehicles equipped with the eight-speed automatic transmission do not require the fluid to be checked. In addition, it is also not necessary to check the fluid of the manual transmission on Vipers and Challengers. |
| No Fluid Leaks present | Visually inspect the under hood area to ensure absence of fluid leaks. Check clamps for tightness an full engagement. |
| UNDER VEHICLE | |
|---|---|
| Description | Action |
| No Fluid Leaks present | Raise the vehicle on an appropriate hoist and check the following: Loose Attachments, Routing Clearance and Damage, Absence of Fluid Leaks. Refer to Service Information for proper lift points. Check clamps for tightness and full engagement. |
| All Fluid Levels | Refer to the owner's manual or service information for proper fluid level inspection locations. Vehicles equipped with the eight-speed automatic transmission do not require the fluid to be checked. In addition, it is also not necessary to check the fluid of the manual transmission on Vipers and Challengers models. Also, do not top off the axle fluid on Ram 1500, Challenger, Charger, 300, Durango, and Grand Cherokee models. |
| Loose Attachments, Routing, Clearance, Damage | Raise the vehicle on an appropriate hoist and check the following: Loose Attachments, Routing Clearance and Damage, Absence of Fluid Leaks. Refer to Service Information for proper lift points. Check clamps for tightness and full engagement. |
| ROAD TEST/OPERATIONAL TEST | |
|---|---|
| Description | Action |
| Perform Road Test, Mileage: Before ______ After ______ NOTE: NOT REQUIRED ON VIPER. | Perform road test (8-10mile, 10-15km guideline) on a variety of road surfaces. Record mileage before and after road test. |
| Engine Starts with All Keys | Start vehicle with all sets of keys. |
| All Warning Lights and Gauges / No DTCs | Verify all warning lights and gauges are operating properly, and no fault codes exist. |
| Keyless Go/Key Sense | Ensure vehicle starts with push button, when key is inside vehicle. |
| Engine Starts Only in Park & Neutral | Verify engine will only start while automatic transmission is in park or neutral. |
| Service and Parking Brakes | Apply the service brakes while the car is in motion. Be sure the brake operation is smooth and positive. Make sure the vehicle stops in a straight line and without pulling to one side. Ensure there is no shudder or vibration when braking. Ensure that the parking brake is easy to operate. Make sure the parking brake does not drag. |
| Brake Transmission Shift Interlock | Ensure that the vehicle will only start when the brake is depressed on vehicles with automatic transmission. |
| Automatic Transmission Shifting | Make sure that the park lock mechanism holds the vehicle. With the vehicle on a grade, put the automatic transmission in park and slowly release the service brake to check the operation of the park mechanism. Make sure the shift lever operates easily and smoothly. Check for smooth shifting. Check for proper upshifting and downshifting. |
| Engine Performance - Cold | The engine should: start properly, idle smoothly and at proper speed, be free from stumbling or hesitation, produce sufficient power, be free of unusual noises, operate within the proper temperature range, and stop when the ignition key is shut off or stop button is depressed. |
| Steering and Handling | Check that the power assist works properly. Make sure that the steering wheel does not vibrate abnormally at idle or road speed. Ensure that the steering wheel is centered when traveling in a straight line. Check that the vehicle does not drift to either side on flat road surfaces. Make sure that the vehicle does not vibrate or shake abnormally. |
| Noise, Vibration, Squeaks, or Rattles | Check that the vehicle is free of noise, vibrations, squeaks, or rattles. Tighten any loose fasteners. |
| Heater / Defrost- Front | Check the heater operation after the vehicle has reached operating temperature. Operate blower motor at all speeds. Operate the system in all modes. Check for hot air at all appropriate outlets. Check for temperature control operation. |
| Air Conditioning | Ensure that the A/C system cools properly. Operate blower motor at all speeds. Check for cool air at all temperature outlets. Operate the system in all modes. |
| Rear Heater and Air Conditioning | Check the rear heater and A/C for proper operation. |
| Defrost - Rear | Ensure that the electric heated rear defroster operates correctly. Turn on and feel for warmth. |
| Blindspot Monitoring System (if equipped) | While on road test, verify that the visual warning indicators located on the side view mirrors are operating properly when an object is within the detection zone. |
| Surround View Camera System | Verify that the image on the touch screen display provides views from all four sides of the vehicle. |
| Cruise Control (if equipped) | Check the "on/off" switch. Check the "set" operation. Check the "resume" function. Check the "accelerate" and "decelerate" function. Check the "cancel" button. Check the brake/clutch release function. If equipped, verify operation of Adaptive Cruise Control function. |
| Set Compass Variance / Calculation (if equipped) | Refer to the service information on TechCONNECT for information regarding compass setting procedures. |
| Tire Pressure Monitoring System | Verify that Tire Pressure Monitoring Indicator Light is not illuminated when tires are above minimum inflation recommendations. Ensure that indicator lamp is not flashing/chiming. |
| Engine Performance - Warm | The engine should: start properly, idle smoothly and at proper speed, be free from stumbling or hesitation, produce sufficient power, be free of unusual noises, operate within the proper temperature range, and stop when the ignition key is shut off or stop button is depressed. |
| Park Assist (if equipped) | Put vehicle in reverse and slowly back up toward an object. Verify that Park Assist warning icon, lights and chimes operate properly as object is approached. |
| Back-Up Camera (if equipped) | Put vehicle in reverse, verify that screen provides a clear and visible image from rear of vehicle. |
| INTERIOR | |
|---|---|
| Description | Action |
| Visually Inspect Interior Parts for Damage, Fit, etc. | From the interior of the vehicle, open and close all doors to ensure ease of operation. Fully open and close the glove box to ensure proper operation. Fully open and close the console door to ensure proper operation. Check interior panels for proper fit and free from damage. |
| All Interior Lamps and Horn | Operate and visually inspect all interior lights and switches, including: Dome/Map lamps, and if equipped the following: vanity mirror lamps, glove box lamps, ash tray lamp, cigar lighter lamp, radio lamps, door mounted lamps, illuminated entry system. Ensure that the horn operates properly. |
| Rear View Mirror | Check that the rearview mirror's day/night function Is operating properly. |
| Front and Rear Wipers and Washers | Activate front windshield wipers, and if equipped, rear window wipers and check for proper operation at all speeds. Activate the front and if equipped, the rear washer. Check the spray pattern for proper operation and aim. Check the intermittent wipe feature for proper operation. If equipped, enable Auto Wiper feature. |
| All interior Door Locks including Child Locks | Check all interior door locks for proper operation, including rear child safety door locks if equipped. Place in the unlocked position. |
| Steering Wheel Mounted Controls | Check all steering wheel controls for proper operation. |
| Cigar Lighter | Check cigar lighter for proper operation. |
| Power Windows and Window Lock Switch | Fully open and close all power windows to ensure proper operation and sealing. Ensure that the windows operate properly at each door. Verify that window lock button is operating properly. Verify the operation of the "One Touch Up/Down" feature if equipped. |
| Outside Power Mirrors | Check power mirrors for proper operation. |
| Power Folding Outside Mirrors | Press Power Folding Mirror button on driver side door trim panel. The switch is located between the Left and Right Power Mirror buttons. |
| Power Heated Mirrors (if equipped) | Check power heated mirrors for proper operation. |
| Seats and Seat Belts - All Adjustments | Check for correct installation and operation of seat and shoulder belts, and retractors. Check that the restraint system safety labels regarding the use of seatbelts and airbags are in place. Fully cycle the seats for proper adjustments and verify that each seat is securely mounted. Fold down and latch the rear seats. Pull forward to check that the latches operate correctly. Check for proper head restraint operation. NOTE: ON GRAND CHEROKEE AND DURANGO MODELS, MAKE SURE THE SECOND AND THIRD ROW SEAT BACKS ARE LEFT IN THE UPRIGHT POSITION AND THE SEAT BELTS ARE LEFT UNBUCKLED. |
| Power Sunroof (if equipped) | Cycle sunroof. Ensure that the sunroof opens and closes easily. Verify proper operation of one touch open/close feature if equipped. |
| Set Clock(s) | Set all clocks to correct time. Refer to Owner's Manual for information regarding clock setting procedures. |
| Audio System | Turn the radio on and check reception in both AM and FM modes. Check for good sound quality from all speakers. |
| Telematic Box Module 2.0 (TBM) | Initialize Telematic Box Module. Note: Refer to Service Information for programming process. |
| Satellite Radio (if equipped) | Turn on satellite radio and verify reception. |
| Confirm UCONNECT Language Set To Market | Refer to User Guide to perform any radio updates/settings. |
| Confirm EVIC Set To Market Unit and Language | Refer to User Guide to perform any radio updates/settings. |
| GPS Navigation | Verify GPS Functions. |
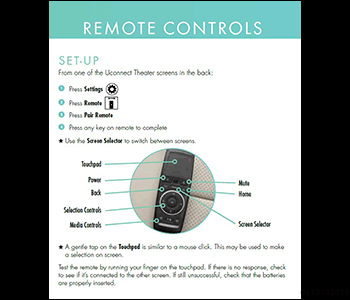
| Video System (if equipped) | Test the Blu-ray player to ensure that a disc will load properly and display on the screen. On vehicles equipped with Uconnect Theater, pair the Bluetooth remotes using the following procedure:
|
| Heated Steering Wheel (if equipped) | Verify that heated steering wheel is functioning properly. |
| Power Outlet(s) | Check all power outlets for proper operation. |
| USB Outlets | Check all USB outlets for proper operation. |
| Integrated Child Seat / Belt | Check the child restraints and child seats for proper operation. |
| Heated Seats (if equipped) | Check for proper operation of heated seats on all power levels, on all equipped seats. |
| Power Cooled Seats (if equipped) | Check for proper operation of ventilated seats on all power levels, on all equipped seats. |
| Tilt/Telescoping Steering Column | Activate the manual/power tilt mechanism. Activate the telescoping feature of the steering column. |
| Remove the protective film from the FamCam | Remove the protective film from the FamCam |
| EXTERIOR | |
|---|---|
| Description | Action |
| Inspect Body and Paint for Damage and Fit/ Finish | Inspect the body exterior for damage, loose or missing items. During the inspection, ensure that no vehicle damage occurred from the time the vehicle was received and the beginning of the New Vehicle Preparation. Note: DO NOT TOUCH UP MATTE PAINT OR CUSTOM COLORS. |
| Remove door edge protectors | Remove the door edge protectors from all doors |
| Exterior Lamps - Headlamps, Turn Signals, Hazards, Park/Tail/License Plate, Trunk Lights, etc. | Operate and visually inspect the following: Headlamps (High/Low Beams), turn signals, hazard warning flashers, parking/tail/license plate lamps, reverse/back up lamps, fog lamps, stop lamps including center mounted stop lamp, daytime running lamps (if equipped), clearance lamps, cargo bed lamps, any other lamps. |
| Lock and Unlock all doors with all mechanical keys | Verify all doors lock and unlock with all mechanical keys including the liftgate, tailgate, or trunk as equipped. In addition, verify that both Ram Boxes lock and unlock with all mechanical keys (if equipped). |
| Doors, Liftgate and Tailgate- Adjust Strikers as Needed | Open each door/liftgate/tailgate from the outside to check outside door handle operation. Check the door detent. Partially close all doors to check the open-door detent. Close all doors/liftgates/tailgates to check the operation of latches and strikers. Adjust strikers as required. Verify liftgate/tailgate ease of operation. |
| Power Liftgate - Inspect for fit and operation (if equipped) | Verify all modes of operation of the power liftgate, including operating the liftgate using the inside switches, hands free mode, and the Remote Keyless Entry transmitter. |
| Power Sliding Door- Inspect for Fit and Operation (if equipped) | Verify all modes of operation of the power sliding door, including operating the sliding door using the inside switches, hands free mode, and the Remote Keyless Entry transmitter. |
| Security Alarm Test (if equipped) | Lock doors using the Remote Keyless Entry Transmitter. Verify the operation of the Vehicle Security System warning lamp. |
| Remote Keyless Entry (if equipped) | Verify that doors unlock properly using all key FOBS. |
| Passive Entry/Keyless Go/Remote Proximity (if equipped) | Verify that the Keyless Enter-N-Go feature is operating properly, by grabbing the door handle of the locked vehicle, while the Remote Keyless Entry transmitter key is within 5 feet of the vehicle. The door should unlock automatically. |
| Remote Start (if equipped) | Verify that engine starts with all keys when using Remote Keyless Entry Transmitter. |
| VEHICLE STORAGE | |
|---|---|
| Description | Action |
| Keep all protective transit film, wheel covers and films on Vehicle Until Sold or Up To 180 Days | Keep all protective transit film, wheel covers and films on Vehicle Until Sold or Up To 180 Days |
| Inflate tire pressure to max side wall pressure | Inflate tire pressure to max side wall pressure (except heavy duty trucks.) Periodically move vehicles to prevent Flat Spotting on tires |
| Periodically move vehicles to prevent Flat Spotting on tires | Periodically move vehicles to prevent Flat Spotting on tires |
| Periodically move vehicles to prevent corrosion on brake rotors | Periodically move vehicles to prevent corrosion on brake rotors. Refer to the Brake Rotor Lot Rot procedure located in TechCONNECT (Refer to DIAGNOSIS AND TESTING - BRAKE ROTOR LOT ROT ). |
| Place vehicle into Ship Mode |
|
| FINAL DETAIL & INSPECTION | |
|---|---|
| Description | Action |
| Inspect paint and body, touch up as needed | Make sure that the body is free from paint chips or scratches. Touch up any chips/scratches using thin layers of paint. Ensure that the body is free from dings and dents. NOTE: ON VIPERS, DO NOT TOUCH UP MATTE PAINT OR CUSTOM COLORS. |
| Perform all incomplete recalls and RRTs (Print a current VIP Report) | Perform all incomplete recalls and RRTs (Print a current VIP Report). |
| Check and Top-Off All Fluids | Check and Top-Off All Fluids |
| Place vehicle into Customer Mode |
|
| Test and record battery state of charge | Check the battery state of charge by connecting a digital voltmeter at the jump-start locations. The battery voltage should be at least 12.4 volts (Fiat 500 BEV -100%). If charging is necessary, follow the service information procedures and recharge the battery. Record voltage on New Vehicle Prep (NVP) form. |
| Adjust tire pressures including spare to door placard | Adjust tire pressures including spare to door placard. |
| Confirm brake rotors do not have corrosion. Follow procedure in Service Information. | Refer to the Brake Rotor Lot Rot procedure located in TechCONNECT (Refer to DIAGNOSIS AND TESTING - BRAKE ROTOR LOT ROT ). |
| Remove interior and exterior Transportation Protective Covers | Remove exterior protective coatings/coverings from vehicle, remove interior protective covers, grease markings on door jambs, unnecessary labels, etc. |
| Wash and clean vehicle exterior | Wash the entire vehicle. Clean the tire sidewalls and wheel/wheel covers (use non - acidic wheel cleaner). Clean exterior/interior glass surfaces. |
| Clean vehicle interior | Inspect the interior trim, seats, carpeting, and moldings. Clean as necessary. |