Disassembly And Assembly: Disassembly
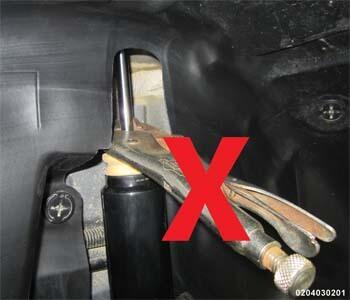
Do not use any type of pliers on the chrome machined surface of shock/strut rod to assist in the disassembly/assembly of shocks or struts. Use only tools designed to hold the shock/strut rod stationary when servicing shock or strut components.
For the disassembly and assembly of the strut assembly, use Mopar Service Equipment 223-7600 (Strut Spring Compressor) or the equivalent, to compress the coil spring. Follow the manufacturer's instructions closely.
Do not remove the strut rod nut before the coil spring is properly compressed. The coil spring is held under pressure. The coil spring must be compressed, removing spring tension from the upper mount and bearing, before the strut rod nut is removed.
- Remove the strut assembly. The strut assembly must be removed from the vehicle for disassembly and assembly. Refer to STRUT, SUSPENSION, ASSEMBLY, REMOVAL AND INSTALLATION .NOTE:
If both struts are being serviced at the same time, mark both the coil spring and strut assemblies during removal as RH and LH for correct assembly.
- Mark the end of the coil spring on the upper spring seat. This is for the correct coil spring position during assembly.
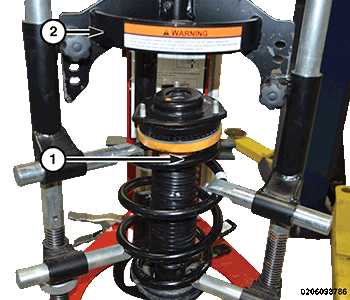
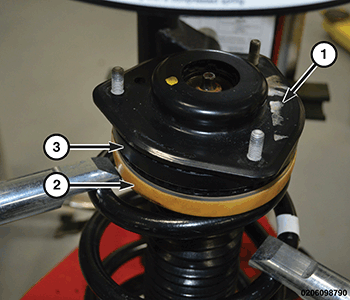
- Position the strut assembly (1) in the strut coil spring compressor (2). Follow the manufacturer's instructions and set the lower and upper hooks of the compressor on the coil spring. Position the strut clevis bracket straight and outward, away from the compressor.
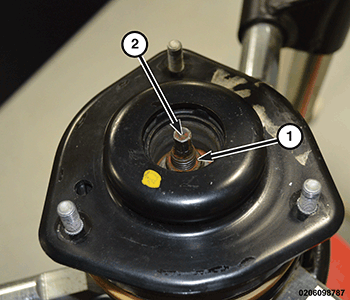
- Compress the coil spring until all coil spring tension is removed from the upper mount and bearing. Once the spring is sufficiently compressed, install the Strut Nut Wrench on the strut rod nut (1). Next, install a hex head wrench onto the strut rod internal hex (2). While holding the strut rod from turning, remove the strut rod nut (1) using the strut nut wrench (special tool #2027800020, Kit, Remover - Installer Shock / Strut).CAUTION:
Never use impact or high speed tools to remove the strut rod nut. Damage to the strut internal bearings can occur.
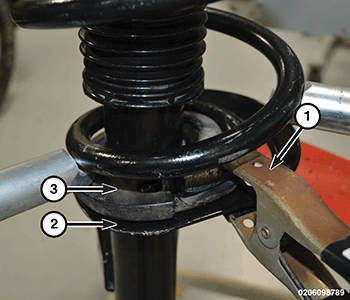
- Remove the clamp (1) (if installed) from the bottom of the coil spring and remove the strut (damper) (2) out through the bottom of the coil spring.
- Remove the lower spring isolator (3) from the strut seat (2).
- Remove the dust shield and jounce bumper by sliding up and off of the strut shaft.
- Remove the upper strut mount (1) from the top of the bearing (3) and upper isolator (2).
- Remove the upper bearing (3) and isolator (2) from the top of the coil spring.
- Release the tension from the coil spring. Push back the compressor hooks and remove the coil spring.
- Inspect the strut assembly components for the following conditions. Install new components as necessary:
- Inspect the strut (damper) for shaft binding over the full stroke of the shaft.
- Inspect the jounce bumper for cracks and signs of deterioration.
- Inspect the dust shield for cracks and tears.
- Check the upper mount for cracks and distortion and its retaining studs for any sign of damage.
- Check the bearing and upper spring seat for any binding.
- Inspect the upper and lower spring isolators for material deterioration and distortion.
- Inspect the coil spring for any sign of damage to the coating.