Removal And Installation: Installation
CAUTION:
Use care when installing caliper onto disc brake adapter to avoid damaging boots on caliper guide pins.
NOTE:
Installation process is the same for both sides of the vehicle.
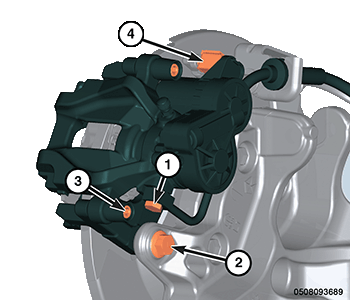
- Position the brake caliper to the caliper mounting bracket.
- Install the brake caliper fasteners (3) and tighten to the proper torque specifications and reinstall the caps over the caliper fasteners. Refer to TORQUE SPECIFICATIONS .
- Install the caliper anti rattle clip.
- Install the banjo bolt (1) connecting the flex brake line to the brake caliper. Install NEW brake hose washers on each side of hose fitting as banjo bolt (1) is placed through fitting and tighten to the proper torque specifications. Refer to TORQUE SPECIFICATIONS .
- Install the EPB actuator. Refer to ACTUATOR, ELECTRIC PARK BRAKE, REMOVAL AND INSTALLATION .
- Install the tire and wheel assembly. Refer to REMOVAL AND INSTALLATION .
- Remove the support and lower the vehicle.
- Connect the negative battery cable. If equipped with an Intelligent Battery Sensor (IBS), connect the IBS connector.
- Remove the brake pedal holding tool.
- Bleed the brakes. Refer to STANDARD PROCEDURE .
- Pump the brake pedal several times to ensure the vehicle has a firm pedal before moving the vehicle.NOTE:
Be sure to exit Service Mode either with the scan tool or by customer method of applying the EPB switch with the brake pedal depressed at the same time, before road testing.
- Road test vehicle making several stops to wear off any foreign material on brakes and to seat brake shoes.