Grand Caravan And Voyager - Lamp
REMOVAL
To avoid serious or fatal injury when working on the High Intensity Discharge (HID) headlamp system, be certain to take the proper precautions. The headlamp switch must be in the OFF position. Disconnect and isolate the battery negative cable. There is a risk of fatal injury caused by contact with high voltage used in the HID headlamps. There is a risk of explosion or fire caused by highly flammable materials in the vicinity of damaged HID lighting elements. There is a risk of injury caused by exposure to Ultra Violet (UV) light, a risk of burns caused by high component operating temperatures, a risk of mercury poisoning through glass splinters produced by bursting HID lighting elements. There is also a risk of poisoning caused by inhalation of mercury vapors and by toxic salts and mercury compounds being ingested or coming into contact with the skin. Do not come into contact with parts that are under high voltage. Persons with active electronic implants (e.g. heart pacemakers) must never work on HID headlamps. Wear insulated safety shoes, safety glasses and protective gloves. Remove flammable materials and ensure sufficient ventilation in the working area.
- Remove the front fascia. Refer to FASCIA, FRONT, REMOVAL AND INSTALLATION
.
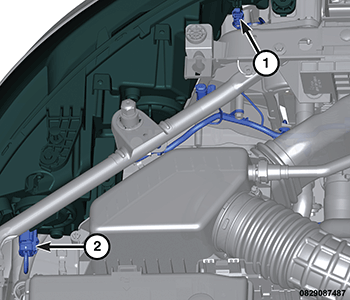
- Disconnect the wire harness connector from the back of the front lamp unit (1, 2).
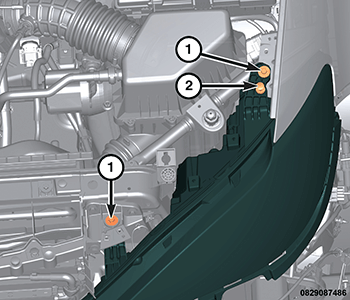
- Remove the upper front lamp unit fasteners (1, 2).
- Remove lower headlamp fastener (not shown in illustration).
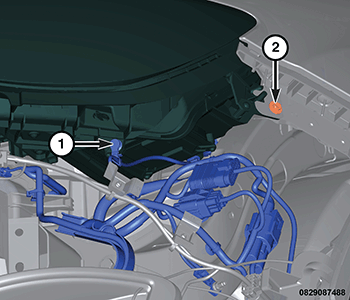
- Disconnect the wire harness connector (1) clipped to the front lamp unit.
- Remove the side front lamp unit fastener (2).
- Remove the headlamp from the vehicle and place it on the bench.
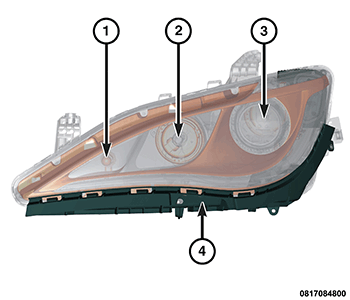
- If replacing the front lamp unit remove the fasteners securing the front lamp unit fascia mounting bracket (4) to the front lamp unit housing.
INSTALLATION
To avoid serious or fatal injury when working on the High Intensity Discharge (HID) headlamp system, be certain to take the proper precautions. The headlamp switch must be in the OFF position. Disconnect and isolate the battery negative cable. There is a risk of fatal injury caused by contact with high voltage used in the HID headlamps. There is a risk of explosion or fire caused by highly flammable materials in the vicinity of damaged HID lighting elements. There is a risk of injury caused by exposure to Ultra Violet (UV) light, a risk of burns caused by high component operating temperatures, a risk of mercury poisoning through glass splinters produced by bursting HID lighting elements. There is also a risk of poisoning caused by inhalation of mercury vapors and by toxic salts and mercury compounds being ingested or coming into contact with the skin. Do not come into contact with parts that are under high voltage. Persons with active electronic implants (e.g. heart pacemakers) must never work on HID headlamps. Wear insulated safety shoes, safety glasses and protective gloves. Remove flammable materials and ensure sufficient ventilation in the working area.
Halogen fog lamp assembly procedure the same as the LED fog lamp.
- If replacing the front lamp unit, transfer the front lamp unit fascia mounting bracket to the new front lamp unit and tighten the fasteners securely.
- Position the front lamp unit to the vehicle for installation.
- Install and tighten the lower front lamp unit fastener to the proper. Refer to TECHNICAL SPECIFICATIONS .
- Install and tighten the lower front lamp side fastener to the proper. Refer to TECHNICAL SPECIFICATIONS .
- Install and securely tighten the upper front lamp unit fasteners to the proper. Refer to TECHNICAL SPECIFICATIONS .
- Connect the wire harness connector to the back of the front lamp unit.
- Install the front fascia. Refer to FASCIA, FRONT, REMOVAL AND INSTALLATION .
- Perform the headlamp alignment procedure.