Washer Reservoir: Installation
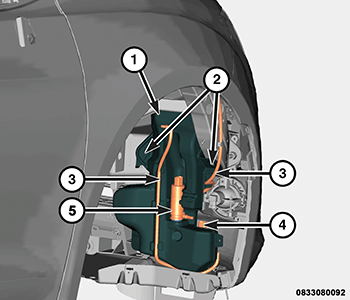
- Position the washer reservoir (1) to the right front support structure of the vehicle. Be certain the locating tab is holding the reservoir in the proper position.
- Align the reservoir mounting tabs with the mounting holes on the right front support structure.
- Install three screws (2) to secure the reservoir to the right front support structure. Tighten the screws to the proper in the following sequence: upper inboard 4-way, then lower inboard 2-way slot, then outboard clearance hole at bottom side of load beam. Refer to TECHNICAL SPECIFICATIONS .
- Lubricate a NEW rubber grommet seal/filter screen(s) with clean washer fluid and install into the washer pump mounting hole(s) in the washer reservoir. Always use a NEW rubber grommet seal/filter screen(s) on the reservoir.
- Lubricate and install a NEW low fluid level sensor grommet and install low fluid level sensor to the reservoir.
- Install the washer pump/motor unit (4) into the reservoir. Refer to PUMP, WINDSHIELD WASHER, REMOVAL AND INSTALLATION .
- If equipped, install the headlamp washer pump (5) into the reservoir. Refer to MOTOR, HEADLAMP WASHER PUMP, EXPORT, REMOVAL AND INSTALLATION .
- Install the washer hoses (3) into the retaining troughs in the reservoir.
- Install the right front wheelhouse splash shield. Refer to SHIELD, SPLASH, FRONT WHEELHOUSE, REMOVAL AND INSTALLATION .
- Install the right front tire and wheel assembly. Refer to REMOVAL AND INSTALLATION .
- Remove the support and lower the vehicle.
- Install the filler neck into the washer reservoir. Refer to RESERVOIR, WINDSHIELD WASHER, REMOVAL AND INSTALLATION .
- Connect the negative battery cable. If equipped with an Intelligent Battery Sensor (IBS), connect the IBS connector.
- Fill the washer reservoir with the clean washer fluid.