Removal And Installation: Removal
- Remove the rear crossmember. Refer to CROSSMEMBER, REAR SUSPENSION, REMOVAL AND INSTALLATION .
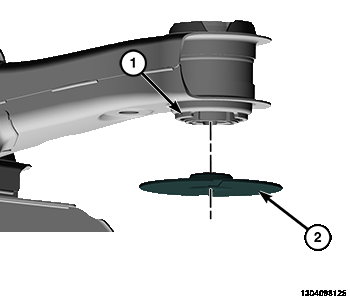
- Remove the washer (2) from bushing inner metal sleeve (1).CAUTION:
It is very important that bushing be installed in same position as original to maintain vehicle ride quality and bushing longevity. That is why bushing, once installed, needs to closely match reference marks applied upon removal of original bushing.
- As an installation reference, carefully mark location of isolator requiring removal on crossmember (around isolator can flange) using a marker or crayon. Do not use a scratch awl to mark location.
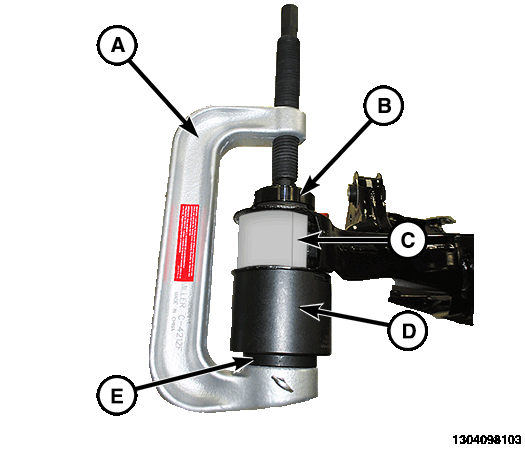
1 - Press, Ball Joint C-4212F 2 - Installer, Bushing 9520-2A 3 - C-Support, Bushing Large 2026300170-C 4 - Receiver, Removal 10106-4 5 - Adapter, Ball Joint Installer C-4212-5 NOTE:Prior to using special tools, lubricate Press, Ball Joint (special tool #C-4212F, Press, Ball Joint) (A) threads to provide ease of use and promote tool longevity.
- Assemble tools over isolator crossmember assembly as shown:
- (special tool #C-4212F, Press, Ball Joint)
- (special tool #9520-2A, Installer, Bushing)
- (special tool #2026300170-C, Support, Bushing Large)
- (special tool #10106-4, Receiver, Removal)
- (special tool #C-4212-5, Adapters, Ball Joint Press)
- Tighten Press (A) screw-drive, pressing bushing out of crossmember and remove all tools.