Removal And Installation: Installation
Be certain to adjust the refrigerant oil level when servicing the A/C refrigerant system. Failure to properly adjust the refrigerant oil level will prevent the A/C system from operating as designed and can cause serious A/C compressor damage.
When replacing multiple A/C system components, refer to the Refrigerant Oil Capacities chart to determine how much oil should be added to the refrigerant system. Refer to OIL, REFRIGERANT, STANDARD PROCEDURE .
Replacement of the O-ring seals is required anytime a refrigerant line or expansion valve is disconnected. Failure to replace the rubber O-ring seals may result in a refrigerant system leak.
- Remove the tape or plugs from the opened refrigerant line fittings and the evaporator and expansion valve ports.
- Lubricate NEW
O-ring seals with clean refrigerant oil and install them onto the evaporator tube fittings. Use only the specified seals as they are made of a special material for the system. Use only refrigerant oil of the type recommended for the A/C compressor in the vehicle.
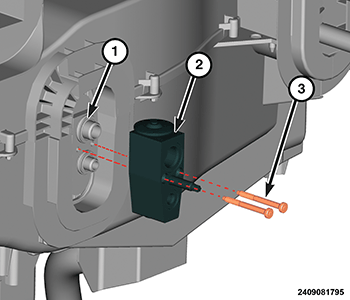
- Install the A/C expansion valve (2) onto the Evaporator Tapping Block.
- Install the two bolts (3) that secure the A/C expansion valve to the Evaporator Tapping Block and tighten to the proper torque specifications. Refer to TECHNICAL SPECIFICATIONS .
- Lubricate NEW
O-ring seals with clean refrigerant oil and install them onto the refrigerant line fittings. Use only the specified seals as they are made of a special material for the system. Use only refrigerant oil of the type recommended for the A/C compressor in the vehicle.CAUTION:
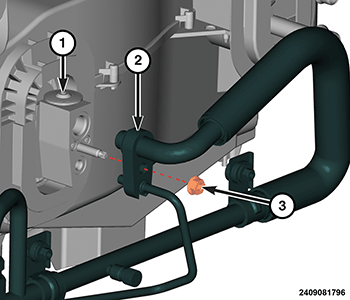
Use care when installing the A/C lines to the A/C expansion valve. Carefully align the tube ends with the valve prior to tightening the A/C line retaining nut or damage to the sealing rings and tube ends may occur.
- Connect the Refrigerant Lines (2) to the Expansion Valve (1).
- Install the nut (3) that secures the Refrigerant Lines to Expansion Valve and tighten to the proper torque specifications. Refer to TECHNICAL SPECIFICATIONS .
- Evacuate the refrigerant system. Refer to PLUMBING, FRONT, STANDARD PROCEDURE .
- Charge the refrigerant system. Refer to PLUMBING, FRONT, STANDARD PROCEDURE .
- Install the engine cover. Refer to COVER, ENGINE, REMOVAL AND INSTALLATION .