Removal And Installation: Removal
multimedia:A supplement to the article is available.
The liftgate inner panel is a combination of magnesium and aluminum alloys. The usage of this type of material utilized in this application requires unique guidelines that must be adhered to.
NOTE:
Due to the usage of magnesium, do not attempt to repair the liftgate inner panel.
NOTE:
When working with a magnesium component be certain to follow all warnings
Refer to WARNING .
Appearance-
- The textured finish on the liftgate inner panel differs from a smooth finish typically found on closure panels.
- The texture is produced from the casting of the component as compared to smooth stamped sheet metal.
- This finish is completely normal and acceptable.
- Do not remove the textured finish to produce a smooth finished appearance.
Workability-
- Do not grind the material, it will create combustible magnesium residue.
- Any sanding of the component is to be done with a scuff pad not a sanding disc.
- Do not make any repairs to liftgate inner panel other than for refinishing purposes.
For further information refer to Liftgate Inner Panel DO NOT REPAIR .
- Remove the liftgate trim panels. Refer to PANEL, TRIM, REMOVAL AND INSTALLATION .
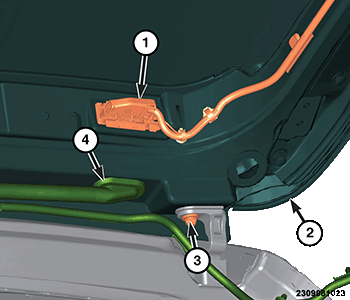
- Unclip the rear washer hose (3) and disconnect it at the fitting (2).
- Remove the grommet (4) from the liftgate and pull the rear washer hose out of the liftgate.
- Disconnect the wire harness connector (1).
- Remove the wire harness grommet (4) from the liftgate (2) and pull the wire harness out of the liftgate.
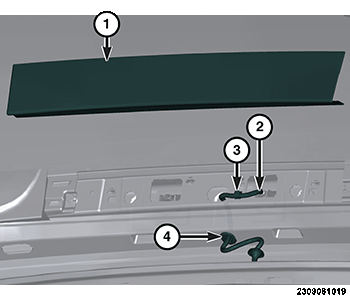
- Using a grease pencil or equivalent, mark the hinge location on the liftgate to aid during installation.
- With the aid of an assistant, support the liftgate and remove the gas prop from the liftgate only. Refer to PROP, GAS, LIFTGATE, REMOVAL AND INSTALLATION .
- With the aid of an assistant, support the liftgate and remove the power liftgate drive unit from the liftgate only. Refer to DRIVE UNIT, REMOVAL AND INSTALLATION .
- With the aid of an assistant, remove the fasteners (3) from each side of the liftgate and remove.