Removal And Installation: Removal
NOTE:
In the event the headliner is damaged or creased during removal, it will need to be replaced with a new headliner.
Use clean gloves or make sure your hands are clean before removing the headliner.
- Disconnect and isolate the negative battery cable. If equipped with an Intelligent Battery Sensor (IBS), disconnect the IBS connector first before disconnecting the negative battery cable.
- Remove the A-pillar trim panels. Refer to PANEL, A-PILLAR TRIM, REMOVAL AND INSTALLATION .
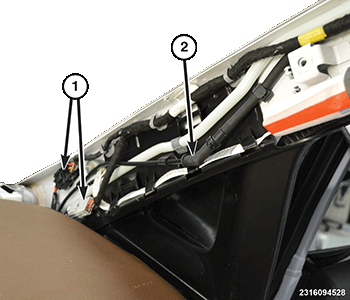
- Disconnect the wire harness connectors (1) and unclip the wire harness from the passenger side A-pillar.
- Disconnect the rear washer hose (2) and unclip the hose from the passenger side A-pillar, if equipped.NOTE:
Washer fluid may drain from this hose when disconnection. Use a container to catch the fluid, then plug the hose with a suitable stopper.
- Remove the upper B-pillar trim panels. Refer to PANEL, B-PILLAR TRIM, UPPER, REMOVAL AND INSTALLATION .
- Remove the C-pillar trim panels and the C-pillar trim extensions. Refer to PANEL, C-PILLAR TRIM, REMOVAL AND INSTALLATION .
- Remove the D-pillar trim panels and the D-pillar trim extensions. Refer to PANEL, D-PILLAR TRIM, REMOVAL AND INSTALLATION .
- Remove the visors. Refer to VISOR, REMOVAL AND INSTALLATION .
- Remove the visor supports. Refer to SUPPORT, VISOR, REMOVAL AND INSTALLATION .
- Remove the overhead console. Refer to CONSOLE, OVERHEAD, FRONT, REMOVAL AND INSTALLATION .
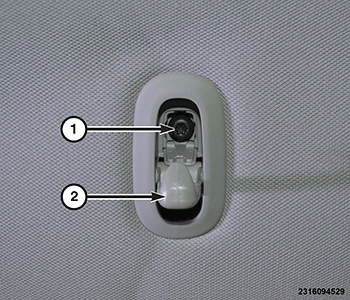
- Open the coat hook, open the screw cover, remove the screw (1) and the coat hook.
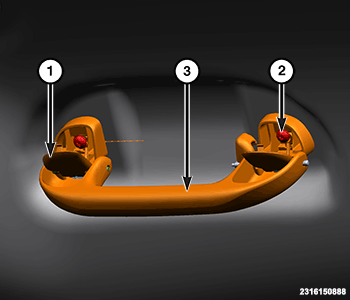
- If equipped with grab handles, remove screw covers (1), remove screws (2) and then remove grab handle (3) from the vehicle.
- If equipped, remove the rear interior camera. Refer to CAMERA, REAR INTERIOR, REMOVAL AND INSTALLATION .
- Remove the passenger side rear quarter trim panel. Refer to PANEL, QUARTER TRIM, REMOVAL AND INSTALLATION .
- Remove the rear auxiliary duct.NOTE:
Lower the second and third row seats, and recline the front row seat fully rearward before the final removal steps.
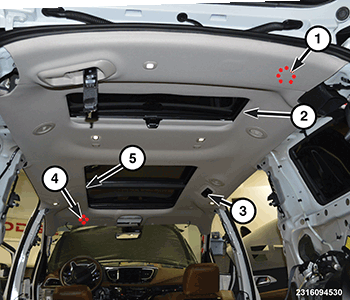
- Using a trim stick or equivalent, release the push fastener at the location (1) at the rear of the headliner.
- With the help of an assistant starting at the rear of the vehicle, release the hook and loop fasteners by hand, then around the sunroof openings (2 and 5), if equipped.
- Using a long trim stick, reach up above the headliner and release the three steel retainers that retain the rear heater controls (3) bracket from the roof panel.NOTE:
The heater controls cannot be removed from the headliner until is if lowered.
- Lower the rear of the headliner slightly and disconnect the rear window washer hose.NOTE:
The hose is attached to the headliner, be careful not to pull it loose.
- Carefully pull the headliner downward releasing all the hook and loop fasteners.NOTE:
If the vehicle is equipped with a sunroof, there is a safety tether on the right side that needs to be released from the sunroof frame.
- Remove the headliner through the rear of the vehicle.
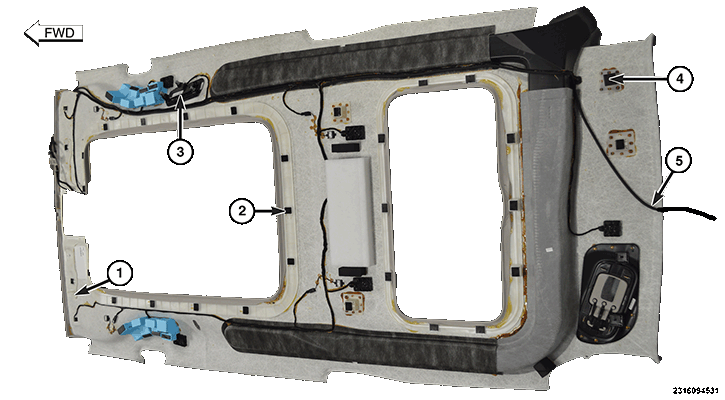
- Headliner shown in illustration lowered for reference. (1) is a locating pin at the front. (2) shows multiple hook and loop fasteners. (3) is the heater control bracket that engages into the roof panel. (4) is the locating pin/push fastener at the rear. (5) is the rear window washer hose.