Removal And Installation: Installation
To help prevent water leaks, partially lower the left and right door glass before installing the glass. This avoids pressurizing the passenger compartment if a door is slammed before the urethane is cured.
Protect all painted and trimmed surfaces from coming in contact with urethane or primers.
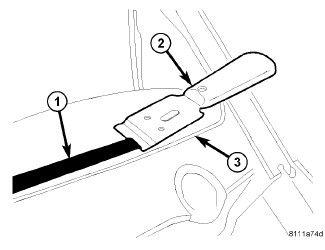
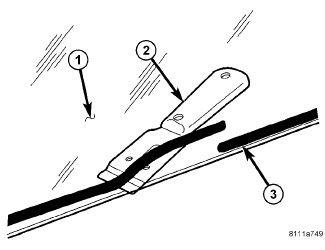
- If the sunroof glass (1) is being reused, remove the as much original urethane (3) as possible from the glass surface using a razor knife (2).NOTE:
To prevent corrosion, do not damage paint on the sunroof glass fence when removing original urethane.
NOTE:The sunroof glass fence should be cleaned of most of its old urethane adhesive. A small amount of old urethane, approximately 1 mm in height should remain on the fence. Do not completely remove all old urethane from the fence, the paint finish and bonding strength will be adversely affected. Replace any missing or damaged spacers around the perimeter of the sunroof glass fence.
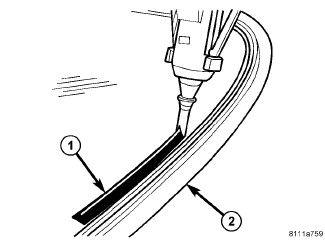
- Using a razor knife (2), level the original bead of urethane (1) on the sunroof glass fence (3) to a thickness of approximately 1 mm (0.04 in.) and remove the loose adhesive.
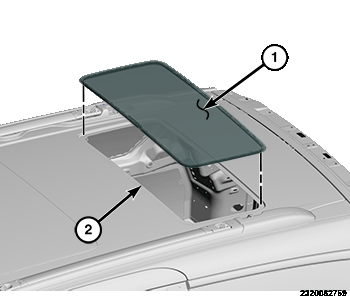
- Using an assistant, position the sunroof glass (1) into the sunroof glass opening and against the sunroof glass fence (2).
- Verify the sunroof glass lays evenly against the fence and around the sides of the opening.
- Mark the sunroof glass and fence with a grease pencil or pieces of masking tape to use as a reference for installation.
- Using an assistant, remove the sunroof glass from the sunroof glass opening and place it on a suitable padded work surface.WARNING:
Do not use solvent based glass cleaners to clean the glass before applying glass prep and primer or poor glass adhesion may result.
- Clean the inside of the sunroof glass with an ammonia based glass cleaner and a lint-free cloth.
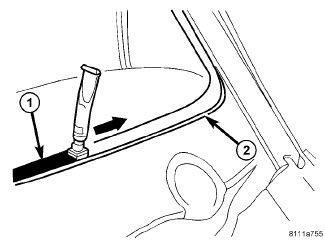
- Apply glass prep adhesion promoter 25 mm (1 in.) wide (1) around the perimeter of the backlight (2) and 5 mm (0.2 in.) from the edge of the glass and wipe dry with a clean lint-free cloth until no streaks are visible.
- Apply glass primer 25 mm (1 in.) wide around the perimeter of the sunroof glass and 5 mm (0.2 in.) from the edge of the glass. Allow at least three minutes drying time.
- Using a flashlight, verify that the primer is completely and evenly installed along the perimeter of the sunroof glass.
- Re-prime any area that is not fully and evenly primed.
- Clean the sunroof glass fence with an ammonia based glass cleaner and a lint-free cloth.
- Apply pinch weld primer 15 mm (0.75 in.) wide (1) around the sunroof glass fence (2). Allow at least three minutes drying time.
- Using a flashlight, verify that the primer is completely and evenly installed along the sunroof glass fence.
- Re-prime any area that is not fully and evenly primed.CAUTION:
Always apply the bead of adhesive to the glass. Always install the glass within 5 minutes after applying the adhesive.
NOTE:If the original urethane adhesive has been exposed for more than 12 hours, the entire adhesive area will need to be re-primed prior to installing new adhesive.
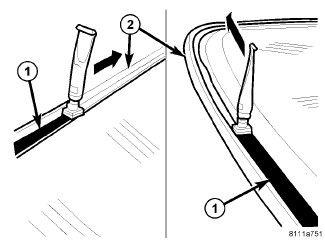
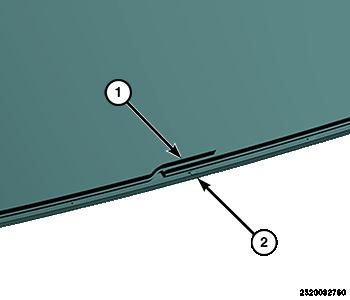
- Apply approximately a 9.5 mm (0.4 in.) wide bead of adhesive (1) with a triangular nozzle approximately 6 mm (0.230 in.) from the edge of the glass (2) starting at the bottom center of the sunroof glass.
- Run the end of the adhesive bead (1) on the sunroof glass (2) parallel to the start of the bead and smooth the ends flush.
- Using an assistant, position the sunroof glass (1) over the sunroof glass opening.
- Using the grease pencil marks or tape as reference points, align the sunroof glass to the opening.
- Carefully lower the sunroof glass onto the sunroof glass fence (3). Guide the sunroof glass (1) into its proper location.CAUTION:
It is no longer possible to move the glass after installation. The glass should never be pressed into place by more than one person, because the glass can break if pressed simultaneously on both sides.
- Push the sunroof glass downward until the sunroof glass comes into contact with the spacers located on each side of the sunroof glass fence.
- Install the sunshade. Refer to SUNSHADE, SUNROOF, REMOVAL AND INSTALLATION .
- Install the headliner. Refer to HEADLINER, REMOVAL AND INSTALLATION .