Engine Front Cover: Installation
WARNING: This page is about a different variant/trim than selected.
- 1.
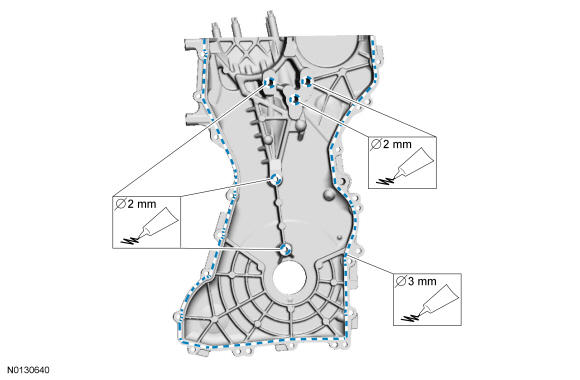
Apply a 3 mm (0.12 in) bead of Silicone Gasket and Sealant to the sealing surface of the front cover.- Apply a 2 mm (0.08 in) bead of Silicone Gasket and Sealant to the 5 center sealing surface of the front cover.
NOTE:
The engine front cover must be secured within 10 minutes of Silicone Gasket and Sealant application. If the valve cover is not secured within 10 minutes, the sealant must be removed and the sealing area cleaned with Motorcraft ® Metal Surface Prep.
- 2.
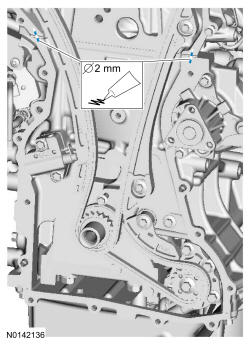
Apply beads of Silicone Gasket and Sealant that are 2 mm (0.08 in) in diameter and 5 mm (0.20 in) in length across the cylinder head and cylinder block joint areas.
NOTE:
The engine front cover must be secured within 10 minutes of Silicone Gasket and Sealant application. If the valve cover is not secured within 10 minutes, the sealant must be removed and the sealing area cleaned with Motorcraft ® Metal Surface Prep.
- 3.
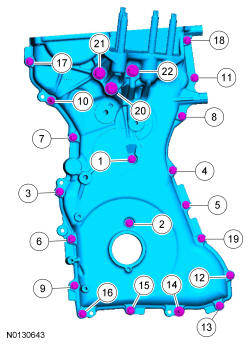
Install the engine front cover, the 21 bolts and the stud bolt.- Tighten in the sequence shown as follows:
- Tighten 1 through 19 to 10 Nm (89 lb-in).
- Tighten 20 through 22 to 48 Nm (35 lb-ft).
- Tighten in the sequence shown as follows:
- 4.
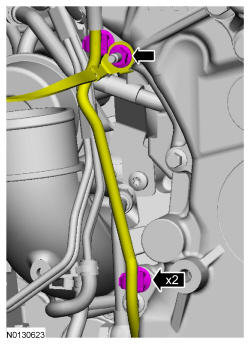
Install the ground strap and nut.- Tighten to 9 Nm (80 lb-in).
- Attach the 2 wiring harness retainers to the engine front cover.
- 6.
Install the engine mount. Refer to Engine Mount .
- 8.
Install the crankshaft front seal. Refer to Crankshaft Front Seal .
- 10.
Install the CAC inlet tube. REFER to Intake Air Distribution and Filtering .